- See more at: http://tutorialgeek.blogspot.com/2010/11/how-to-change-your-blogger-domain-url.html#sthash.sezFio1Q.dpuf

Wednesday, August 29, 2012

Patio Furniture

The backyard chronicles continue -
We last left off in late June; we’d just had a new concrete patio poured. With the additional space, we finally had room for an outdoor dining set. And so the hunt for patio furniture began…

After comparing sets and measuring our space, I decided I wanted a rectangular dining table with room for 6 chairs. And after an incident with Ringo and our current bistro set, it would have to be mostly metal. I also wanted the option to add an umbrella since the table wouldn’t be under the patio cover.
I quickly realized that patio furniture is really expensive, even a cheap Wal-Mart set was going to be at least $400. Obviously I wasn’t going to pay that, so I started searching Craigslist multiple times a day. Stores also started putting their patio furniture on clearance, so I searched online and in-store too.
2 months later – I saw this picture on Craigslist:

Obviously that set is nothing like what I was looking for, but they lived close by and only wanted $80, so I clicked on the listing…
And there it was - the second picture in the listing:

$80 for the first set, $100 for the dining set, or $150 for both sets…
I bought both sets =)

Here’s my new outdoor dining set (cushions trashed and freshly hosed off):
(umbrella not pictured)
And here’s my new conversation set:

It’s pictured on the patio, but I think it’ll end up in the pool area. We could use more seating in there.
Oh, and ignore all of the weeds in the pictures – we’ve gotten a lot of rain the past few weeks and they are running rampant throughout the yard. This Friday is going to be yard work day, so most of that should be cleaned up.

I’m so happy to finally have some patio furniture…and just in time for the holiday weekend (not that we have anything planned). I still need to replace the cushions, but at least it’s a start. We still have TONS of work to do in the backyard, but it’s coming around slowly. You’ll probably see more backyard projects once the weather starts cooling down in a couple months. I can’t wait!

And if you are wondering what the Ringo incident was– here’s a picture of my bistro-set chairs:

Sigh…

Wednesday, August 22, 2012

DIY Instagram Magnets

Finally, a project! Today I’m going to show y’all how to make Instagram magnets. They are really easy to make and a lot cheaper than ordering them from one of those websites.


First, you need your Instagram pictures. I used followgram – just replace my Instagram name with your Instagram name to see your feed. Click on a picture and right-click to save.

Next we’ll use PicMonkey. Select Create a Collage – click the layout button (the one with the rectangle and 2 squares) – click Square Deal and choose the 3 x 3 option

Now we add our pictures. Click the image button (the one that looks like mountains and the sun) – click Upload photos – select 6 photos

And then the finishing touches. Click the background button (the paint tray) – change the spacing to 0 – save collage

OK, we’re almost done. Open the picture to edit – select crop – use the drop down to select 4x6 – position the crop feature around your picture (it should fit perfectly) – click apply – save your picture

Now to print – I had my picture developed through Wal-Mart’s 1-hour photo. You can upload your pictures online and then pick them up in the store. But you can use any store you like or print them out yourself. 19 cents later, I had my print.
You also need a magnet sheet - I found this one at Michael’s for $2.79. It also comes in a roll for $9.99, which might be a good option if you plan on making a lot of these.

The magnet sheet I bough is adhesive, so you can just stick your picture on. If you can’t find the adhesive one, you can just use spray adhesive to mount your photo. If you plan correctly, you can fit 8 Instagram pictures on 1 sheet.

And finally, cut your pictures out! You can use scissors if you are talented enough to cut a straight line. I’d recommend a ruler and utility knife (don’t forget to protect the surface you’re working on) or a heavy-duty paper cutter – that’s what I used.
And here they are on my fridge (holding an RSVP card that need to be returned):

So, 6 Instagram magnets for about $3 – cheaper than ordering them online (9 for $14.99)! If you want to make more than 6, I’d still recommend 4x6 prints. Normally, they are a lot cheaper than 8x10 prints. Let me know if you have any questions - or if you end up making some for yourself!

Are you on the Instagram bandwagon? I don’t post pictures very often, but you can find me at SAMTJH22 if you are interested. If you have an account, leave your user name so I can follow you. 
HookingupwithHoHBeyond The Picket Fencemaking monday marvelous linky partyLil\'LunaToo Much Time On My Hands

Monday, August 20, 2012

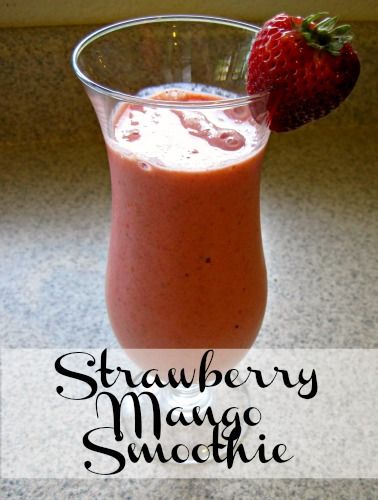
Strawberry Mango Smoothie

This is a Sponsored post written by me on behalf of NECTRESSE™Sweetener. All opinions are 100% mine.


It's still miserably hot here in Phoenix, so I've been looking for ways to keep cool during the hot summer days.  I recently had the chance to try NECTRESSE™Sweetener and I figured a cool beverage would be a great way to test it out. NECTRESSE™Sweetener is the only 100% natural sweetener made from fruit - monk fruit extract, available where you shop.


7 medium/large strawberries (stems/leaves removed)
1/3 cup mango (skin removed)
2 packets of  NECTRESSE™Sweetener
1/4 cup plain Greek yogurt
1/2 cup of ice (about 5 cubes)

Place all ingredients into a blender. Cover and blend until smooth.

Note: Frozen fruit can be used in place of fresh fruit. Adjust the thickness of the shake with additional ice.

 
NECTRESSE™Sweetener worked great in this smoothie. I couldn't tell the difference between it and sugar. However, I thought that  the sweetener had a slight fruity taste (probably because it's made from fruit), so I'm not sure how it would work as a substitute in some desserts, say chocolate chip cookies. But it might be worth a try considering all the calories you'd save vs. sugar.
 
Want to try NECTRESSE™Sweetener for yourself? Visit here for a FREE sample of NECTRESSE™Sweetener

To learn more about NECTRESSE™Sweetener, check out the video featuring Lisa Ling:


Tuesday, August 14, 2012

Shopping Trip: HomeGoods

While I was out shopping the other day I decided to start a new series on the ol’ blog. Inspired by Young House Love’s Window Shopping series, I’m going to start taking y’all along on my shopping trips (virtually, of course). I’ll cover big box stores, thrift stores, small local shops, and whatever else I come across.  I’ll share my favorite finds and what I bought (if anything). I thought this would be a fun way to share a little more of my design style…and to look a pretty things. Oh, and I should add that none of this is sponsored.
Let’s get this series started with a trip to HomeGoods!
I spotted this ginger jar as soon as I walked in the door. This one was $39.99, but it was pretty large. I’d love to find a smaller one in yellow (or white) for my mantle.

This artichoke lamp was on clearance for $39.00. If you’ve ever bought lamps before, you know that’s a great price since it also includes the shade. If there was another one, I probably would have bought them for the bedroom.

I loved these pictures and the reminder to enjoy life and be happy.  I’ve been pretty stressed the past few days, I should follow the message and “worry less.” $39.99 for the pair.

Doesn’t this fabric look just like F. Schumacher Imperial Trellis? Obviously it’s not because this dog bed was only $39.99 and that fabric is over $100/yard.

Add a little whimsy to the usual set of candlesticks with these owl candlesticks – on clearance for $12.00.

I loved this garden stool, especially the color, but I was feeling way too cheap to spend $69.99. Sigh, now I kinda wish I would have bought it.

I loved the x-legs on this bench and the nailhead trim. It was $59.99.

HomeGoods always has a huge selection of pillows. These were 3 of my favorites. The Greek key and chevron pillows were $19.99 and the green one was $24.99. I came *this* close to buying the green pillow. It was large and fluffy, but I didn’t think it’d look good with the pillows I just bought at Target.

This pedestal bowl was $16.99 and would look cute on a kitchen counter as a fruit bowl. 

After all of that, I bet you’re wondering what I ended up buying. The answer is, nothing! I usually get overwhelmed in stores like HomeGoods because I want everything, so I leave with nothing - I know it doesn’t make any sense. Plus I’m cheap…

So, what do you think? Do you like the new ‘Shopping Trip’ series? What’s your favorite item from above? Do you shop at HomeGoods? Any recommendations for future shopping stops?

Wednesday, August 8, 2012

Insta-16 : Take One

A couple of months ago I gave into the peer pressure and joined Instagram. I’m not too active because I don’t think anyone cares to see pictures of everything I eat and I don’t want to overload everyone with puppy pictures, but I do add pictures every couple of days or so. You can follow me at: SAMTJH22
Anyway, I know not all of you are on Instagram, so I decided to share my pictures on here too. Every 16 pictures, I’ll do a post. My plan is to share a pretty collage of all the pictures and then pick my top 5 in different categories: Abby, Ringo, Cutest Couple (Ringo and Abby), Yummy (Food or Drink), and Wildcard (Non-Food and Non-Puppy).
So without further ado, I present to you, my first 16 Instagram pictures:

OK, let’s talk favorites:
Abby
Yes, we let Abby sleep with us - we can’t say no to that sweet little face. She loves to snuggle, so by the middle of the night she’s practically laying on top of me.

Ringo
He’s a little monster, so this is probably the sweetest you’ll ever see him look. I was sitting at the dining room table eating ice cream and he obviously thought if he looked cute enough I’d give him some. It was chocolate ice cream, so he didn’t get any…poor guy.

Cutest Couple
This was the day after the 4th of July. We had a party at our house and Ringo ended up playing in the pool for about 8 hours. He slept the entire next day. Abby is always lazy, so she loved bumming around with him. Ringo was being so well behaved (because he was so tired) that I let him lay in bed with us for part of the day.

Yummy
My birthday dinner: Hurricane Rolls from Zushi.  My favorite sushi roll in the entire world! Yes, I ordered 2 of them =)

Wildcard
This picture is from a huge storm we had about a month ago. I was out shopping and got caught out in the rain. It was coming down so hard that I couldn’t drive. I waited it out in the parking lot surrounded by falling trees. See that bushy looking thing on the ground? That’s part of the tree that broke off and landed on someone’s car. They ran out and moved the car (no apparent damage) before I could get a picture of it. This is the same storm that “flooded” our backyard and had Abby bouncing through puddles.

That rounds up my first Instagram recap! As you can see, I mostly take pictures of my pups – because they are so cute and I love their little faces.  Once again, if you have Instagram, my name is SAMTJH22. If you don’t have Instagram, you can follow my feed online here. 
Do you Instagram? Do you have a favorite Instagram picture? Leave your Instagram user name and/or link to your favorite picture in the comment section – I’d love to see them!

life rearranged

Monday, August 6, 2012

Summer Before – August Progress

As promised, I’m back with another craft room update. I’m so excited to see some actual progress in the room! Just as a reminder, we last left off here:

OK, now let’s talk about the progress I’ve made since the last update!
The day after that post I took apart the desk. It was a beast and I probably should have waited for my boyfriend’s help, but he was out fishing and I’m impatient, so I did it all by myself. It was fine other than my back hurt the next day.
Then it was paint time! I chose Sterling by Benjamin Moore in eggshell.

It’s a really light gray, which was perfect for this room. The room is tiny and has no natural light, so I didn’t want to use a dark color and turn it into a cave. This was my first time using Benjamin Moore paint and I loved it. For the trim and door I used white straight out of the can (Wal-Mart brand).

Then I painted all of the shelves. Just as a reminder, this is what the shelves used to look like:

Formerly particle board brown, they are now the same white as the trim. I also peeled the Rubbermaid stickers off of the brackets – that was a pain!

Right now I’m working on the desk. I can’t wait until it’s done and I can start putting the room back together! Only a few weeks left until the end of August and the end of my challenge!

LinkWithin