- See more at: http://tutorialgeek.blogspot.com/2010/11/how-to-change-your-blogger-domain-url.html#sthash.sezFio1Q.dpuf

Monday, April 29, 2013

Epic Mother’s Day Giveaway!


Yes, you read that right! You could win a Cricut Expression 2 (a $249 value) AND your CHOICE of a Canon Rebel T3 or a Kitchen Aid Artisan 5 Quart mixer!
AND!!! The same prize package for your mom (or whomever you’d like to give it to)!
Isn’t that awesome?!
You can enter to win through the Rafflecopter widget below. This is a big group giveaway, so there are a lot of entries to be had! Contest runs from now until Thursday, May 9th.
And because this is Mother’s Day themed, I have to share this picture of my mom and me…from 25 years ago!

You can see where I get my blonde hair from!


a Rafflecopter giveaway

The participating bloggers were not compensated for this post.
No purchase is necessary to enter. Void where prohibited by law. The odds of winning are based on the number of entries received.** This promotion is no way sponsored, endorsed or administered by, or associated with, Facebook.** To qualify to win, you must fill out the Entry. See Rafflecopter for complete rules. This giveaway is compliant with Facebook Promotions Guidelines. Must be aged 18+ to enter & win. Valid only in the United States. Void where prohibited by state or national law.
 

Wednesday, April 24, 2013

6 Tips for Painting Perfect Stripes

I’m not going to write a full tutorial on painting stripes because there are already plenty of those out there. Today I just want to share 6 tips that helped me create straight, level, crisp stripes around my office. See the full room here.


Make life easier by picking an odd number. By choosing to paint an odd number of stripes you can leave the top and bottom stripes the original wall color. That means not cutting in at the ceiling or the baseboards! I went with nine stripes that were about 10.5 inches wide.

If you are going to paint stripes around the entire room, start with the simplest wall. Start with a wall without windows or doors, if you have one. That way you’ll have one full wall of stripes to help line up the stripes around the rest of the room. This will make more sense in the last tip.

Buy a level/straight edge/ruler in one. I bought this Stanley one at Wal-Mart for $5.88 and it was worth all 588 pennies. Seriously, this will save you so much time and (potential) heartache. Pretty much all of the stripes in the room are based off the very first one you measure out, so it needs to be perfect. Just line it up with the ceiling, make sure it’s level, and make your mark. Do this across the wall and then use the straight edge to mark your line and the level to make sure it’s straight.

Mark the stripes you aren’t painting with tape. This might seem stupid, but just a few chunks of tape every couple of feet will help you avoid any confusion or mistakes.

Use the original wall color to seal the edges of the tape. This is my number one tip for crisp lines! After you tape your stripes, use a brush and paint the original wall color over the edges. Trust me, it works! Remember the blonde moment I mentioned? Well, my blonde moment was accidently painting the new stripe color to seal the edges. Once I realized my mistake and pulled off the tape, I saw that the paint had bled under the tape in some spots. Using the original wall color really does help keep the lines clean.

Oh, and here’s half a tip…once you are all done painting, pull the tape off. Don’t wait for it to dry! I pulled the tape off after I finished every two stripes.

And finally, use your first wall as a “guide” to measure the remaining walls. Instead of measuring from the ceiling down, measure from the corner of your “guide” wall. Your ceilings might be higher/lower on each wall, so this will ensure the stripes all meet at the corners.

And those are my 6 tips for perfect stripes! Who’s ready to start painting?! If you decide to paint stripes in your own home, feel free to ask any questions. I’m certainly not an expert, but after painting four walls I feel like I made enough mistakes/good decisions to help answer most questions. Or if you have any tips of your own, leave them in the comments!
 
HookingupwithHoH Chef In Training Lil\'Luna


Monday, April 22, 2013

Striped Office!

The stripes are finally done! It took longer than planned, but it looks amazing! I’m so happy with how the room turned out!
Before I get started with the after pictures, I should mention paint colors. The room was already painted White Clay by Behr and I ended up using Sandstone Cove for the other stripes. It was the next color on the paint card.

OK, now let’s look at pretty stripe pictures!
As you saw a couple weeks ago, I finished 2 walls the first weekend.

I had planned to finish the rest of the room the following weekend, but I had a blonde moment (started painting the wrong color), so I only finished this wall and half of the window wall.

And finally, I re-taped the rest of the window wall and finished up painting the stripes on Saturday.


And that’s the 360-degree tour of the striped office! But to fully appreciate how far this room has come, let’s look at a before and after. When I bought the house, the room was bright purple with a Winnie the Pooh border:


I quickly painted over the purple with White Clay by Behr.


The room already looked 100x better with the fresh paint job, but I’d planned to paint stripes in here before I even officially owned the house. 2 years later…


STRIPES!
As for the $ breakdown, the whole project only cost about $50 for the paint, two rolls of Frog Tape, a level, and paint trays/rollers. Obviously the major commitment for this project is time and patience. For anyone wanting to paint stripes at home, I’ll be back later this week to share my tips for perfect striped walls. It won’t be a full tutorial (there’s plenty of those already around), but just a few tips/tricks that helped me keep my lines straight and crisp.  

**Edited: You can see my 6 Tips for Painting Perfect Stripes here

And with that, here’s my office to-do list now:
Sell current desk on Craigslist
Clean out room
Paint stripes
Replace outlets and switches with white ones
Find table to use as desk
Buy 2 chairs
Buy pair of desk lamps
Buy and paint file cabinet
Mount TV on the wall
Create a gallery wall around the TV
Build pallet artwork
Sew curtains
Buy sleeper sofa
Buy/build end table
Buy dresser
Paint dresser
Sew pillows
Add accessories
 
Beyond The Picket Fence

Wednesday, April 10, 2013

Half Way There!

I was hoping to have a full stripe reveal this week, but I seriously underestimated how time consuming this project would be. So much measuring and taping – at least Abby kept me company!

I’m planning to finish the last two walls this weekend, so hopefully I’ll have a full striped room reveal next week! I love how it looks so far and I can’t wait to finish up.

Next week I’ll also share paint colors, tips for straight lines with no bleeding, and the one tool you must buy for this project!

Monday, April 8, 2013

Blog Makeover

The Junk House got a makeover last week! Some of you have already noticed, but if you haven’t seen it yet, click over and check it out!

Back in January I made a few blog goals to make The Junk House easier to navigate, quicker to load, and just a general style update. I had planned to do it myself, but ended up hiring someone…and I’m happy I did! I love how it turned out! Isn't the little house on the H cute?!

If you are in the market for a blog makeover, whether you want a full update or just a new header, I definitely recommend Jess. She was easy to work with and put up with all my demands. And I think she has some of the best prices! You can see some of her other designs here

Wednesday, April 3, 2013

Easy Numbered Crate

Sound the horns! I actually created a project that I pinned!

If you’ve been following for over a year, you might remember that my big project last March was my pantry makeover. If not, you can check out the before/after pictures here. I never completely finished my to-do list (big shocker, I know), but now I’m back, a year later, with a pantry project.
One of the best updates I made to the pantry was organizing everything into jars, baskets, and crates. It keeps everything more organized and it just looks less cluttered. Last year I bought a couple crates from Hobby Lobby to hold chips and rags and I’d planned to buy a couple more to hold the rest of the towels and cleaning supplies. But eventually I moved on to other projects and forgot about the pantry until I saw this crate project from Kelli at Lolly Jane:

Not only are they cute (and functional), they are also cheap and easy to make! The crates are regularly $11.99 at Joann’s, but are only about $7 after your handy 40%-off coupon. I lucked out and got a 50%-off coupon in my e-mail, so I only paid $6.53 (including tax) for my crate.
I stained the crate Dark Walnut, which I already had on hand. Then I used my Silhouette to cut out the letters and number.

I used some CraftSmart Robin’s Egg Blue that I had leftover from my painted pot herb garden to paint the letters and numbers. I only did one coat of paint and then removed the vinyl stencil as soon as I was done painting. After the paint dried I lightly sanded it with very fine sandpaper. This is a great way to make it look more aged and hide any mistakes (paint bleeding under the stencil, brush marks).

I love how it turned out! I’m already planning another trip to Joann’s (with another coupon) to buy one more crate for the pantry!
Here’s my cleaning supplies shelf before:

And here’s how it looks with my new crate! It definitely looks more organized and less cluttered!

Thanks Kelli for sharing such a great find and an easy transformation! You can see Kelli’s crate project here and her amazing craft storage system here.


Monday, April 1, 2013

Insta-16: Take Four


It’s time for another round of Instagram pictures! You can see the previous three recaps here
If you have an account, you can follow me at: SAMTJH22.  If not, this recap is for you! I’ve rounded up my last 16 Instagram pictures for you here today. It’s been awhile since my last Instagram post, so this roundup includes everything from Las Vegas to The Glitter Academy to Spring Training Baseball!
As always, my plan is to share a pretty collage of all the pictures and then pick my top 5 in different categories: Abby, Ringo, Cutest Couple (Ringo and Abby), Yummy (Food or Drink), and Wildcard (Non-Food and Non-Puppy).
OK, enough talk! Here’s the second round of Instagram pictures: 

As always, it was hard to pick favorites, but here they are:

Abby

Don’t look at me!
This picture always makes me laugh. She’s such a sweet, silly dog (with big ol’ paws)!

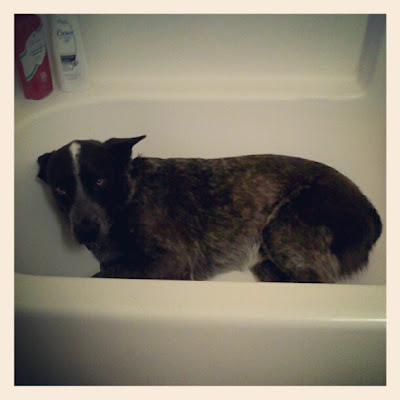
Ringo

I’d been avoiding giving Ringo a bath in the tub for months because I assumed it was going to be complete chaos, but it’d been too cold to hose him off outside like usual. One day I felt brave and gave him a bath…and he loved it! He jumped right in the tub, drank water from the faucet, and stood there while I soaped him up and rinsed him off. It was amazing! And now he’s obsessed with the bath tub. If I dry my hair in this bathroom, he’ll hang out in the tub or sometimes I randomly hear him climbing in to sleep in there. Now I swear he gets dirty on purpose so I’ll give him a bath! Silly dog!

Cutest Couple

This is exactly what it looks like. Ringo loves to hold Abby down and lick all inside her mouth and gums. He also cleans out her ears…whether she wants him to or not!  

Yummy

For Abby’s 1st birthday I made dog-friendly red velvet cupcakes with dog-friendly icing and milk bone toppers! Ringo and Abby LOVED them! If you are wondering, I got the cake and frosting mix in my monthly BarkBox.

Wildcard

I took my dad to a spring training baseball game at the beginning of the month. He’s a huge Angels fan, so it was fun for him to see his favorite players and it was a good chance for us to hang out. We don’t really spend that much time with just the two of us, so it was a nice opportunity to enjoy some father/daughter time. The weather was perfect and we had really good seats…it’s hard to think of a better way to spend an afternoon!

OK, who else is on Instagram? Leave your username in the comments, so I can follow you.


LinkWithin