- See more at: http://tutorialgeek.blogspot.com/2010/11/how-to-change-your-blogger-domain-url.html#sthash.sezFio1Q.dpuf

Wednesday, November 30, 2011

November – A Look Back

My computer still dying a slow death, so I haven't been posting lately…but I can still do my monthly recap because my pictures are already edited and online. Looking back it was a slow month – that’s what happens when you are out of town 3 of the 4 weekends. And then sidelined with computer problems! Anyway…
I started the month with some thank you shout-outs. I’ll say it again – you ladies are seriously cool.

We took a weekend trip to Greer, AZ and little Ringo got to play in the snow for the first time.

I sewed not 1, not 2, but 3 new pillows!


I completed one master bathroom project.

And shared the rest of my master bathroom to-do list.

I participated in Lesley’s first photo challenge. And then sucked at linking up for the next couple challenges…

Thanksgiving came and went…
Free Printable from The Fickle Pickle

And then my computer crapped out on me…


I’m hoping to be up and running by next week. Cross your fingers the restore works!
One of my first posts back will be about the master bathroom! 2 projects are getting crossed off the list!

Thursday, November 24, 2011

Happy Thanksgiving!

I hope everyone has a wonderful Thanksgiving full of family, food, and fun!
Free Printable from The Fickle Pickle

And to my international followers, Happy Thursday! =)

Monday, November 21, 2011

Bird is the Word

A few weeks ago I told y’all on facebook that I ordered a yard of Joel Dewberry Aviary 2 Sparrows – Plum fabric.

The plan was to make 2 pillows for the master bedroom. I love my white comforter, but it needed a little pizzazz. However, after I placed my order I realized that 1 yard wasn’t quite enough fabric for 2 – 18” pillows. So I went to Wal-Mart and bought ¼ yard of purple fabric to add-on.

I sewed the pillow covers using the same method as my other pillows: the 10 Minute Pillow Cover tutorial from Alicia at Thrifty and Chic. I matched up the edges of the fabric in the back, so no one would see the purple from the side.

The back view of the finished pillow cover:

Then I stuffed the covers with 18” pillow inserts. This is the back view of the stuffed pillow:

And this is the front view:

*swoon*
Yes, I still need a headboard. I have a plan…I just haven’t executed it yet.

Cost
1 Yard Aviary Fabric (plus S&H) – Fabric.com $10.58
¼ Yard Purple Fabric – Wal-Mart $0.87
18” Pillow Inserts – Wal-Mart $9.00 x2
Thread – on hand

Total $29.45


Wednesday, November 16, 2011

Photo Challenge – Animal

No DIY or craft project today - instead I’m partying with one of my favorite bloggers! My girl Lesley at Fabulously Flawed just started up a weekly photo challenge…you can read more about it here.
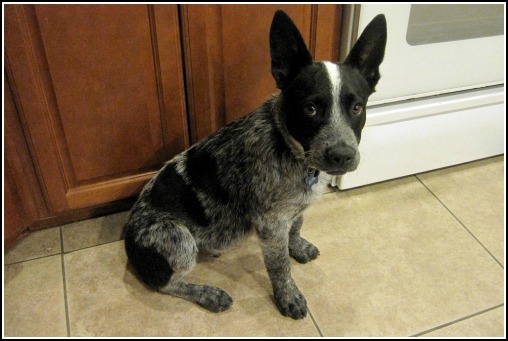
This week’s theme is animal…which is perfect because I happen to have a wild animal at home! And I gave him his first bath last night! I wanted to take pictures of his first bath, but that didn’t happen. You ever give a honey badger a bath? Me neither, but I’m pretty sure it’d be similar experience!
Anyway. Here’s my soft, clean and fresh smelling Ringo:


That squeaker toy is his arch-nemesis.

Tuesday, November 15, 2011

The List – Master Bathroom

Today we’re talking master bathroom status – what’s been done and what’s left to do.
The master bathroom is probably the one thing I dislike most about my house. It’s so small! Maybe someday we’ll do a major renovation on it, but for now we’re fixing it up as-is.  
(Note: It isn’t easy taking pictures of a small room with lots of mirrors without the camera catching the pajama-ponytailed photographer. You might notice an elbow hiding here and there.)  
Before:

Yep, I only have 1 before picture…
Oh, and this is what the light fixture looked like:

Now let’s take a tour of its current state:


Time for my favorite part: Making Lists!
Done:
Paint Walls (Secret Locket by ColorPlace)
Replace Faucet
Replace Showerhead
Replace Toilet
Toilet Paper Holder
Trashcan

To Do:
Add Baseboards
Rug
Replace Missing Drawer
Paint Vanity
Replace Medicine Cabinets
Do Something with Large Mirror
Hang Towel Rack
New Towels
Artwork
Finishing Touches

Actually, the to-do list isn’t too bad! A lot of the hard stuff is already finished – mostly thanks to my dad. He replaced the faucet, light fixture, showerhead, switches and outlet, toilet and toilet paper holder for me. Yeah, he’s awesome.
OK, the list is made…time to get to work!

Monday, November 14, 2011

Pretty It Up

I mentioned a couple weeks ago that I’m going to start working on the master bathroom. And what have I accomplished in there since then? NOTHING! This is why my blog is called The Junk House and not The Quick Turnaround Time House…
I blame it on being out of town last weekend (Greer) and this past weekend (out of town wedding). Side note: When did people stop dressing up for weddings? Did I miss the memo that a sweater (that’s not even covering the butt), leggings, and boots are appropriate church wedding attire? Anyway, we ended up coming home Saturday instead of Sunday, so I was determined to finish one project during the weekend…even if it was the easiest one on my list.
This is what I’d been using to organize my hair styling tools. Functional, but not exactly my style.

I’ve had this metal basket in my stash for kind of a long time. I bought it ($2.99) for this exact purpose, but never got around to painting it. Typical.

I removed the ribbon and spray primed it gray. Then I painted it Ocean Breeze by Krylon. A little distressing and glazing later…

Detail shot:

Pretty!
Now that my blow dryer is styling it’s time to get working on the rest of the bathroom. Tomorrow we’re talking master bathroom status – what’s been done and what’s left to do.

Wednesday, November 9, 2011

Pillow of Shame #2


Remember Pillow of Shame #1? And how it was one of my “decorative” pillows for 3 years?
5 months later…meet Pillow of Shame #2:

(I'm not even an Oakland A's fan)
Ohhh, the horror!
OK, the real horror is that I let this live on my couch for 3 years + 5 months!

Finally this pillow is getting a new look!

I started by laying my pillow out on a piece of fabric to “measure”. I say “measure” because I just sorta eye-balled it.


Then I used blue painter’s tape to create stripes on the fabric. I used a couple extra pieces to evenly measure between the stripes.


This is what it looked like all striped up.


While the fabric was just “hanging out” by the pool, I mixed Clorox bleach and some water in a spray bottle. I eye-balled about 1 part bleach, 2 parts water…next time I’d use more water.


Then I lightly sprayed my fabric with the bleach mixture. Just remember you can always spray more, but you can’t spray less! Oh, and please do this outside or in a well ventilated area. I don’t want you getting stoney-boloney off bleach fumes.


The bleach will start working quickly. This picture was taken after only a couple minutes. Let the bleach dry, remove the tape, and then throw the fabric in the wash machine. You’ll want to wash the bleach out of the fabric before using as a pillow, obviously.

Once my fabric was washed and ironed I used the 10 Minute Pillow Cover tutorial from Alicia at Thrifty and Chic to sew a new cover (I used the same tute for Pillow of Shame #1).

And bam:


Bleach striped pillow!

I’d planned to sew a button in the middle to give the pillow that tufted look,


but that plan is on hold until puppy decides to stop chewing/eating everything.


So maybe one day you’ll see this pillow again and it’ll have its button bling…


Disclaimer: I was provided a bottle of Clorox Bleach as part of the Clorox Regular-Bleach DIY Fashion campaign

Monday, November 7, 2011

Greer Getaway

Alternate Title: Why I Didn’t Finish Any Projects This Weekend

We finally made it to Greer, AZ!

If you’ve been following since June you might remember our original trip was postponed twice. First the lodge we had reservations at burned down, then the town was evacuated because of a wildfire. Long story short: we ended up in a dog-friendly cabin in November. Yep, that means we took the pup!

And don’t be fooled by the picture…he didn’t lay peacefully in the backseat for the whole trip. He ended up sitting/sleeping in my lap almost the whole way home.  
This is what the town looked like when we got there on Friday:

And this is what it looked like Saturday morning:

Yep, that means Ringo got to play in the snow for the first time! He L-O-V-E-D it!

We spent the day alternating between hiking in the snow and sitting by the fire.

Look at that face! haha!

I think we all had fun on our snowy getaway. Although, my boyfriend and I were a little bummed that we weren’t there during the summer to fly fish and kayak…maybe next summer!
This wouldn’t be a Junk House post unless we talked thrifty-ness. Thanks to Groupon we stayed 2 nights for the price of 1 and saved money at a local restaurant! *

Anyone else take a weekend getaway? Get snowed on? Do something else awesome during the weekend?

*This was not sponsored by Groupon…I paid for my Groupons just like everyone else.

LinkWithin