- See more at: http://tutorialgeek.blogspot.com/2010/11/how-to-change-your-blogger-domain-url.html#sthash.sezFio1Q.dpuf

Thursday, September 27, 2012

Rug Painting Party – Week 2

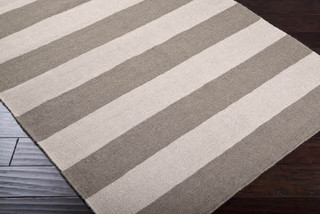
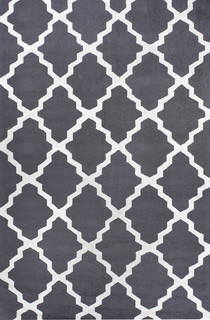
Last Thursday I announced that I was joining Linda from My Crafty Home Life and a group of amazing bloggers on a three week rug painting challenge. I shared some rug inspiration pictures and detailed my plan of attack. Now today we’re talking progress -
So, the only real progress I’ve made is finding out what won’t work…
I decided to try a “paint by numbers” approach using the rug’s existing herringbone pattern.

I love how it looks, but it took me 25 minutes to paint just those 2 sections! It’s really time consuming trying to keep all of the edges perfectly even and straight. I’d say there are at least 50 more of those sections on the rug – just counting the ones I’m painting white, not including the gray sections – and I really don’t want to spend that many hours painting a kitchen rug…SOOOOO, stripes it is!
And now I’m down to one week until the final reveal - it’s rug painting crunch time!
I hope some of the other ladies are off to a better start than I am! You can check out the rest of the rug painting projects on the blogs below:


Monday, September 24, 2012

Shopping Trip: Target

Who’s ready for another virtual shopping trip?!
Today we’re stopping at Target – one of my favorites! I love Target and it’s only 3 miles from my house…very dangerous for the ol’ pocketbook. I swear I can’t leave that store without buying something!

Let’s start the trip off with some bright pops of color for your kitchen/home.  I want the yellow bowl in the middle, but of course it’s one of the few things in this picture not on clearance. Right now it’s $16.49 – the smaller version is on clearance for $7.48.

These metal canisters are also on clearance. How cute would this set look on a kitchen counter?! They are a steal at $3.98, $4.98, and $6.48, respectively.

I love these placemats! I’ve almost bought them multiple times – like they were in my cart, but then I put them back because I’m too indecisive - $3.99 each.

Originally $39.99 each, these glass lamps are marked down to $11.98. Great price for lamps…if they were taller, they’d be mine.

My kind of plant! It stays green forever; no watering required! I want one of these for the shelves on my entertainment center - $19.99.

These lanterns are huge and I love them! They would look great indoors or out. For the size, I think they are a great deal for $24.99.

I love this vintage camera bookend! It would look so cute holding up books on my entertainment center - $14.99

Tufting and nailhead trim?! The bench hits all the right notes – and it opens for storage. AND look at those cute little feet! Yours for $89.99.

I love these soap pumps; I look at them every time I go to Target! I would buy one, but I prefer foaming soap…sigh. The short and the tall soap pumps are $9.99.

This yellow bathroom rug ($24.99) is so cute and cheerful. It makes me want to re-do one of my bathrooms so I can use it. Actually, I just pictured the soap pump from above and this rug in my bathroom…now I really have the urge to do an update…

Sheer panels are a great way to add some privacy to your windows without blocking the natural light. I love these patterned sheers - a great alternative to the usual plain ones. $19.99/panel.

OK, now after all of that goodness it’s time to show you what I bought:
2 ikat-print pillows for the living room -on clearance for $9.99 (originally $19.99).

Looks like Ringo approves!
I'm also seriously considering buying that soap pump and rug for my master bathroom...

OK, let’s hear it – which item(s) is your favorite? Do you already own any of them?

You can check out my first Shopping  Trip post (HomeGoods) here


Thursday, September 20, 2012

Rug Painting Party – Week 1

I’m excited to announce that I’m joining up with some amazing bloggers for a three week rug painting challenge - created by Linda from My Crafty Home Life.  Today we are all sharing our plans and inspiration, next week we’ll share our progress, and two weeks from now will be the big reveals. You can find a list of the other participating blogs at the bottom of the post – be sure to check them out!
I joined the party because my house is in desperate need of some rugs. The guest bathroom is the only room in the whole house with a rug! While I’d love to add rugs around the house, that ain’t gunna happen until the pups are a little older. They are both potty trained, but they both have the occasional accident – they can only wait by the back door for someone to let them out for so long...I know, our fault.
That being said, my plan is to paint a rug for the kitchen – by the sink. I feel like I spend half the night in the kitchen, so it’d be nice for my feet to have a break from the tile. I’ve had the perfect kitchen-sink-sized IKEA rug laying around for months now  (I think it’s this HESSUM mat, but it’s been so long since I bought it, I’m not even sure).


As for my plan, I’m torn between stripes and a Moroccan-ish pattern. Or I’m considering a “paint by number” approach on the existing herringbone pattern of the rug. I don’t want anything too bold that’ll compete with my roman shades, but I still want something fun.

So while I haven’t decided on a pattern yet, I’ve definitely decided on colors – gray and white. I think those 2 colors will look great with the fabric on the roman shades.

And if I want to move the rug, I’ll work everywhere else in the house.

So that’s my plan of attack, but don't forget to check out the other participating blogs for their projects! I bet there are going to be some seriously amazing rugs revealed in two weeks!


Wednesday, September 19, 2012

Cutting Edge Stencils Giveaway!

NOW CLOSED!


I’m so excited for today’s giveaway – Any One Stencil (up to $50 value) from Cutting Edge Stencils!


I’m a huge fan of Cutting Edge Stencils after my headboard project. If you missed it, you can see yesterday’s Stenciled Upholstered Headboard project here.  I used the Zamira Allover stencil, but there are a lot of other great choices.

Admittedly, it took a really long time to stencil all of the fabric, but it was so worth it! I ended up with the exact pattern and color that I was picturing. Each stencil is reusable, so you’ll probably see another stencil project on the blog at some point!  
For those of you who have never stenciled before, Cutting Edge Stencils has a great “How to Stencil” video that you can view here or check out their YouTube channel for other related videos. You can also check out the Cutting Edge Stencils blog for tips and project inspiration.

OK, let’s talk giveaway details: One person will receive any stencil of choice (up to $50 value) from Cutting Edge Stencils. They’ll even ship it for free! Open to US residents only. Giveaway ends Sunday, September 30th at midnight. I'll e-mail the winner on Monday morning - if no response within 48 hours, a new winner will be picked.
This is my first time using Rafflecopter, so if you have any problems entering, please let me know.

Tuesday, September 18, 2012

Stenciled - Upholstered Headboard

I can’t believe this day has finally come! Back in June I decided to build a headboard for the master bedroom - at the beginning of the month I shared my plan…and at the end of the month I publicly admitted failure. Well, three months later…I have a headboard!
Before I get into all of the details, how about a sneak peek?

Isn't it pretty?!
You might remember that my main hang up for this project was the fabric. I couldn’t decide on a fabric – and when I did, the fabric didn’t look as good in person/didn’t look good in the room.  Sigh. But then one glorious day, Cutting Edge Stencils contacted me to see if I wanted to review one of their stencils! And that’s when I decided to stencil my own fabric. Then I could customize the design and color – problem solved.
I picked the Zamira Allover Stencil for my project. I bought 3 yards (but only used 2.5 yards) of white upholstery-ish fabric from Wal-Mart for $6.99/yard. The paint color is CraftSmart Robin’s Egg Blue (found at Michael’s) and the fabric medium is Martha Stewart (also from Michael’s).

I’m not going to write a full tutorial for any of this because there are already a lot of great ones out there, but I will share a few tips that helped me…and hopefully will help you if you decide to do this yourself.
For stenciling fabric, Becca has a great tutorial with a lot of helpful advice. My main tips would be to use spray adhesive and don’t use a lot of paint on the roller. Oh, and if the paint does bleed under the stencil, you can just use a small paint brush to do touchups. The touchups aren’t noticeable at all with a big pattern like this one.

I’m so happy with how the fabric turned out! Stenciling took for-ev-er, but it was so worth it! I can’t say enough good things about Cutting Edge Stencils. I would definitely buy stencils from them in the future for other projects – accent walls, curtains, furniture, etc. They have a large selection and the quality is great – not like the cheap, flimsy ones in the craft store. Stay tuned for a Cutting Edge Stencils related announcement at the end of the post.
OK, now let’s talk headboard – I don’t have a full tutorial because there are A LOT of them already out there, but here’s my quick tips. Note: I have a king-size bed.
Instead of buying foam, which can be really expensive, I used a full-size foam mattress topper. It was about $12 at Wal-Mart and was big enough to do 2 layers. As you can see below, it wasn’t quite long enough, so I just added an extra little piece to the end – after the batting and fabric, you can’t tell the difference. I used the leftover spray adhesive from my stencil project to hold the foam.


After the foam I added two layers of batting (found at Joann’s) and then my fabric. The fabric was a little stiff from the paint, but ironing it (with the steam on) seemed to help.


I used the excess material to cover any of the wood that might be seen from the top/sides. I decided to use the entire piece of plywood so I wouldn’t have to worry about hanging it from the wall or adding legs. It seemed like the easiest way…and I didn’t have to mess with a saw.


And here it is:

I’m so happy with how it turned out. Having a headboard makes the room look so much more finished! Although, now I want to buy bigger lamps and I need to find something to hang above the headboard.


Ringo and Abby love it too!

OK, that’s a bit of an exaggeration. Ringo was more focused on trying to bite the buttons off the comforter and Abby just wanted to lick my face. I had to bribe them with treats to get this picture. I don’t know how people get pictures of their dogs laying sweetly in the background.
Anyway, I’m so happy with my new headboard…and that I conquered my first stenciling project!

And now for the big announcement: Tomorrow I’ll be hosting a giveaway for a stencil of your choice (up to $50 value) from Cutting Edge Stencils! Check back tomorrow for all the details! 

Giveaway is now closed...


Primitive and Proper
Tickled Pink at 504 MainFurniture Feature FridaysLiz Marie BlogPhotobucketToo Much Time On My HandsHookingupwithHoH
 

Tuesday, September 11, 2012

Pitiful Wall: Take One

I’m about to show you something pretty pitiful. This is what my large living room wall has looked like for the past 6 months or so:

Yep, nothing but an IKEA nightstand and chewed up plant. It’s the first thing you see when you walk in the house…and it’s not giving a very nice first impression.
In my defense, I’ve been looking for a console table/buffet on Craigslist for MONTHS. I just haven’t found anything I like…or it’s already gone when I call. Thankfully, I finally solved my problem with a little online shopping.
Have you heard of/bought anything from Wayfair before? It’s kind of a long story how I found their site, but I’m happy I did. Oh, you want to hear the long story? OK, hear it goes: I was looking for chairs for my craft room on eBay and found a set I liked. They were being sold by Wayfair, so I googled the name and realized they were an actual company….I guess that wasn’t that long of a story.
Snooping around Wayfair I found this console table for $133 plus free shipping. Definitely a great price considering it’s 4 feet long, has a drawer, and has a shelf (and has great reviews).

Before I get too far ahead of myself, I want to talk a little about buying furniture online. It can definitely be tricky…and expensive if you have to ship something back. ALWAYS measure your space before you order…returning a piece because it’s too big/small can easily be avoided with a few minutes and a tape measure.
I wanted to make sure this piece would be big enough for the wall, but not stick out too far. I taped off the height, width, and depth of the piece so I could really see what it would look like in that spot.

It fit, so I ordered it. With a 10% off coupon code, it was only $119.70! Oh, that’s another online shopping tip: always look for coupon codes and save yourself some money!
A few days later it arrived on my door step ready to be assembled. I have to say that this was one of the easiest pieces of furniture I’ve ever put together. It took less than 30 minutes from the time I decided to put it together to assembled and in place.  

Now that you’ve seen my new table, are you wondering why the title of this post is Take 1?
It’s because the console table isn’t staying that color! Yep, it’s going to get a fresh pop of color soon. And of course it needs some styling…poor guy is pretty plain right now. So next time you’ll see this wall, it should look happy and fun, not pitiful like the first picture.

Any color suggestions? Anyone else have any online furniture shopping tips?

Thursday, September 6, 2012

Craft Room Lighting

Today I’m dreaming of beautiful new light fixtures for my craft room makeover…
Unfortunately, the room is small and stuffy, so I’m kinda forced to keep the ceiling fan that is currently hanging in there. But a girl can dream, so here are some lights that I’m lovin’ from Mail Order Lighting.
I love this white flower pendant. It’s fun and whimsy…and would look great with my newly-painted white shelves.


This flower pendant is similar to the one above, but is a little more modern and blingy. I like the black chrome finish on this one.

OK, some might think that this is a little over the top…but I’d LOVE to have a chandelier in my craft room! 

OK, how about this one? Not nearly as flashy as the previous one, but still has that chandelier vibe…and it has that black chrome finish that I liked above.

And finally, this one - still kinda flashy, but in a different way. It’s definitely a little more fun and whimsy than a typical chandelier.

I think the first one is my favorite. Which one do you like? Anyone else stuck with ceiling fans, but dreaming of beautiful light fixtures?


LinkWithin