- See more at: http://tutorialgeek.blogspot.com/2010/11/how-to-change-your-blogger-domain-url.html#sthash.sezFio1Q.dpuf

Tuesday, April 1, 2014

Shopping Trip: Antique Plaza

Today we’re going (virtual) antique shopping! 


Antique Plaza is two-stories of antique/vintage finds - it’s hard to believe that I’ve lived here for over five years and have never been to this antique mall. Actually, I’ve never even been to Mesa’s historic downtown area. It’s lined with shops, restaurants and even the Arizona Natural History Museum. Clearly I need to get out more…
 

Like most antique shops, there are booths filled with old toys. I even recognized a few toys from when I was little…I’m getting old!


And of course there are plenty of old tools and items for the guys to look at. I’ve never taken my boyfriend antique shopping with me, but there was one booth with old fishing stuff that he’d probably like.


Painted furniture is big seller in antique stores right now (like this end table I bought). This is the booth of another local blogger, Laura from My Dear Trash. Actually, reading about her booth on her blog is the main reason I stopped by Antique Plaza. 


OK, let’s look at some of my favorite finds:
 

I’ve never been to Australia (maybe someday…), but I love this colorful lithograph - it’s signed and numbered. The yellow mat and yellow frame is a little too much yellow for me, so I’d probably paint the frame or have it re-framed. There was a second print too…$39/each.


As most of you know, I collect white ironstone. It’s the main thing I search for while I’m antique shopping. I found these white ironstone plates in one booth for $9.95/each.  I would want at least a set of four, but didn’t feel like dropping 40 bucks on four plates so I had to pass. I still kinda want them though…


This glass case held an impressive collection of Jadite items. So pretty, but way too expensive for my taste. These items are obviously for a collector and not someone who just likes the pretty green color. For example, that set of 4 bowls in the bottom corner was $145.


This ironstone pitcher and basin would have come home with me if I had a place for it. I’ve never seen ironstone with that fuchsia colored stripe. Originally priced at $89, it was marked down to $49. Such a good price and such a great piece…ugh, I want it!


I’ve never seen Tiffany & Co dishes, so this cake set definitely caught my eye. Five plates and a cake stand for $25.99.


Speaking of cake stands, this glass cake stand was $28 AND everything in that booth was 50%-off! You can’t buy a glass cake stand new for $14!


OK, now let’s talk about an “antique” item I don’t understand buying/selling – bedpans! I see multiple bedpans every time I go antique shopping, so I assume someone is buying them. I just don’t get it! This one was $32, which isn’t even a good deal (according to my Amazon search). Someone please explain this to me…


Anyway, let’s talk about what I did buy – I bought four ironstone bread plates for $11. I found two in one booth for $2/each and two in another booth for $3.50/each. I also bought this print of the Paris Opera building. The picture made me think of my mom and I eating Pierre Hermé macarons on the steps of that building while we were in Paris. It was originally $39.95, but it was marked 60%-off so I only paid $15.98. The frame is in pretty bad shape, so I’ll probably have to reframe it, but I love the picture.


Do you like antique shopping? Do you look for anything in particular? If you are local, I also recommend Merchant Square Antiques in Chandler and Main Street Antique Mall in East Mesa.
 

You can see other Shopping Trip posts here



Tuesday, March 25, 2014

New Coffee Table

I FINALLY BOUGHT A NEW COFFEE TABLE!
 

Um yeah, I’m a little excited over here…sorry about the yelling.
 

Anyway, I’ve been working on my living room for the past year, which means I’ve been looking for a coffee table for the past year. Yeah, I’m picky. The criteria for my perfect table is as follows: white, no bottom shelf (so more of my pretty rug would be visible), large (about the same size as our current table), and reasonably priced. That’s not asking much, is it? Apparently so...


I’ve debated every option from sawing the bottom shelf off our current table and painting it white to building a new table from scratch to refinishing a table from Goodwill/Craigslist, but I’ve just never found the perfect solution.
 

As soon as I saw this Standard Furniture Cambria Coffee Table from Wayfair, I knew it was the one. The measurements were perfect, the price was right ($205) and I’ve had good luck in the past with Wayfair (I ordered my console table from them), so I ordered it right then. 


It arrived less than a week later and I couldn’t wait to put it together. As you can see, Ringo was obsessed with the box and kept dropping his ball in it. 


Everything was already assembled, so I just had to screw the legs on and add the piece of glass. It was so quick and easy…unlike some IKEA furniture.  


I love it! Although I wish it wasn’t so bright white…it’s way whiter than our entertainment center…maybe I just need to get used to it.
 

I will admit that I’m a little worried about the glass top and Ringo. He’s a walking tornado, but our glass end table has survived the past couple of years, so I’m hopeful the glass coffee table top will as well. We’ll see...


And with that, I can cross another item off my to-do list. It’s been awhile since I’ve reviewed my to-do list, so let’s see where I’m at now:
 

Find sectional
Buy rug
DIY abstract art
Re-paint console table
Paint China Hutch
Sew curtains
Apothecary cabinet
Find coffee table

Sew throw pillows
Buy garden stool/end table
Style entertainment center shelves
Replace missing baseboard
Replace arm chair
Buy large plant/pot
Decorate fireplace mantle
Accessories


Wednesday, March 19, 2014

Places I've Been - US & World Travel Pin Maps

I’m about to share one of my favorite projects to date!


For the past couple of months I’ve been looking for a large piece of art to hang on one of the walls in the office, but I just couldn’t find anything that I liked for that space. Coincidently I’ve wanted to create a travel pin board for awhile now…probably since I saw this one in Young House Love’s gallery hallway, so this seemed like the perfect solution.  I wanted a US map and world map, so my original plan was just to buy couple maps, back them with cork and hang them on the wall. Turns out it’s hard to find matching US and world maps that aren’t massive. So I moved on to Plan B – the DIY version.
 

I started with this corkboard from Hobby Lobby. It was originally $69.99, but it was on sale so I only paid $34.99. Actually I had a gift card leftover from my birthday, so I didn’t pay anything for it.


Then I used my Silhouette to draw the United States and world maps. I bought this shape for the states and this shape for the world (99 cents each from the online Silhouette shop). I also bought the Silhouette sketch pen starter kit from Amazon for $15.50 (although now it’s $19.99) for this project. I have to say that I absolutely love the pen set. I never really thought about using the Silhouette to draw things, so my mind was blown watching it draw out my maps!


I cut the maps to the same size and used double stick tape to hang them on the corkboard. 


To mark the places we’ve been I just used sewing pins. Places I’ve been are marked with fuchsia pins, places my boyfriend has been are marked with navy pins, places we’ve been together are marked with teal, and home is marked with a yellow pin.  I only marked places if we actually spent time visiting or sightseeing…airport layovers didn’t count. 


I love how it turned out, plus it was fun asking my boyfriend about places he’s been. I didn’t know he’d been to Mount Rushmore! I think it’s funny that my pins are mostly around the coast and his are mostly inland. 


I decided to use the rest of the space on the board to add pictures from our various trips. I cut them all into 4”x4” squares, so they’d be uniform. I missing some pictures from trips I took pre-digital camera days and I don’t have pictures from my boyfriend’s trips, but it’s a start. There’s still plenty of room to add more pictures too! 


Seeing all of those blank states really makes me want to hop in the car and road trip up the west coast and through the mid-west. Too bad I don’t have enough vacation time to do that!
 

Since we are talking about vacation plans - this seems like the perfect time to share the news about our next “teal pin”.
 

...*drum roll*….
 

ALASKA!
 

Yep, we’re headed to Alaska in July to fish the salmon run! We are flying in a day earlier than our friends so we’ll have an extra day to do some sightseeing around Anchorage. Then we are all off to the Kenai River to fish (and sightsee) for the week. I’m not really an outdoorsy person, so this is a little out of my comfort zone, but I couldn’t pass up the opportunity for an Alaskan adventure!
 

Have you ever been to Alaska? Any trips/recommendations?


Beyond The Picket Fence


Monday, March 17, 2014

Spring Training Baseball


It’s March in Phoenix, which means the weather is perfect, my allergies are killing me, and Major League Baseball is in town. For those of you who don’t follow baseball, half of the major league teams play pre-season ball in Arizona and the other half in Florida.


I’m not a huge baseball fan, but I try to make it to at least one spring training game each season. It’s good for my pale skin to actually see the sunlight once in awhile =)
 

Over the past six months or so, the City of Mesa has been busy building a brand new stadium for the Chicago Cubs. We live in Mesa (I remember voting for the new stadium a few years ago), so of course we wanted to check out the new park.
 

A couple Fridays ago my boyfriend and I decided to play hooky from work to catch a ball game at the new stadium. I bought the tickets from StubHub and we ended up with great seats for cheaper than face value.


Anyway, the new stadium looks great and the game was definitely more fun than spending the afternoon in a cubicle.


Speaking of new stadiums, the Arizona Diamondbacks and Colorado Rockies share a stadium in Scottsdale that was built just a few years ago. I’ve been wanting to check it out, but just haven’t made it over there for a game yet…
 

Well, I finally got a chance to watch a game there on Saturday. My dad is a huge Los Angeles Angels fan and he wanted to see a game while they are in town. There were only two Saturday games left on the schedule and one happened to be against the Rockies at the new stadium…it was meant to be! I bought our tickets off of StubHub again and we had great seats, but I did pay over face value this time. My dad LOVES baseball, but usually only gets to see one game in person each year, so it was worth the money.


The stadium is really nice and the weather was bright and sunny – it was a great day at the ballpark. Plus it was fun spending some one-on-one time with my dad. If you are wondering about my mom, she also drove down to visit, but doesn’t like baseball so she spent the afternoon shopping.


Anyway, if you live in Arizona or Florida I encourage you to check out a spring training game, even if you don’t like baseball. The tickets are cheap and the weather is usually perfect. Plus it’s fun for kids because most of the players will sign autographs before the game. Just don’t forget to bring something for them to sign and a sharpie!
 

And don’t forget the sunscreen! 


Tuesday, March 11, 2014

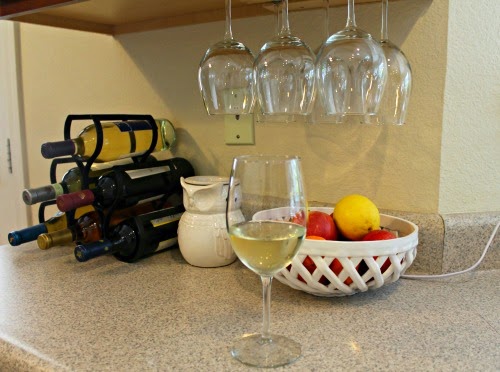
Wine Glass Storage

I don’t know how people live with kitchens that don’t have upper cabinets. I see all of these beautiful kitchens on blogs and Pinterest that don’t have upper cabinets or they just have a couple small shelves with decorative items...where do they put all of their dishes and glasses? Or do they not really use the kitchen? I don’t get it. 


We have a couple upper cabinets in our kitchen, but I’ve always wished for more space. Three years later I finally figured out a solution to free up almost an entire shelf. 


An under-cabinet wine glass holder!
 

I found this one on Amazon for $11.65, but if you are handy, you could probably build one yourself. On second thought, just spend the $11.65 and save yourself the time/effort. 


It was pretty simple to install - just a little measuring and drilling. I wanted to hang them the other direction, but they were too long to fit under the cabinet that way. I could have cut them down, but then I’d only be able to fit four glasses instead of six. Plus they fit under the cabinet perfectly this direction, so it was meant to be.  


Of course I had to celebrate a successful project with a glass of wine! 


Tuesday, March 4, 2014

Office Finishing Touches – Part 1

You may or may not have noticed that I only posted once in February…and it was about a project I’d done in December. I was crazy busy and stressed out at work (plus the recent loss of my uncle) – yeah, I’ve been in a funk. I didn’t want to do anything after work or on weekends other than lay around in my sweats and watch TV. I realize now how unhappy I was and how I really let myself go downhill. Long story short – I’m out of my funk and ready to get myself back together and start working on projects/blogging again. Oh, and I also got a new job! It’s with the same company and still in finance, but I’ll be in a different group and working on a different program (United Kingdom). I’m excited for the change, but I’ll miss my current group and manager.  Hopefully the new group will be just as fun…

All of that to say, I’m back! Today I’m sharing a few recent updates in the office. First off, I bought a new pair of pillow covers. I ordered them off of Etsy from Skoope Home. The owner is closing her shop, so everything is on sale – 2 pillow covers for $25! Usually I make my own pillow covers, but with the cost of fabric plus the time I’d take me to sew them, I’d say $12.50 per pillow is definitely a deal! I do want to add that they are made to order, so it took about a month from when I placed my order to when they arrived on my door step. The quality is great, but don’t order if you are in a rush…although, I don’t know why you’d be in a rush for a pair of pillow covers...


Anyway, I’m also working on styling the end table. I found this lamp at TJ Maxx for $29.99. I had a $25 gift card from my credit card points, so it only cost me $7.40 after tax. I love it! 


I’m still deciding on the rest of the accessories – like the plant that needs a new pot (I haven’t found one that I like yet). I love how this room is turning out and I can’t wait to finish it. Right now I’m working on a travel pin board for one of the walls. Hopefully I’ll have that post later this week or early next week. 


Tuesday, February 11, 2014

Mirror, Mirror

Sorry I’ve been MIA the past couple weeks. I’ve been crazy busy at work and haven’t had time/energy to blog or work on any projects. Today I’m going to share the final project I finished over Christmas break. If you’re counting, I ended up finishing four of the projects on my list (I sold my desk, updated our gallery wall, painted the china hutch, and now this). I had hoped to finish more projects during my time off, but painting the china hutch took more effort than I had originally planned. I do have the supplies for a couple of the other projects on my list, so hopefully I can get those done soon.

Anyway, let’s talk medicine cabinets. We have two medicine cabinets in our master bathroom and I love all the storage space. Unfortunately, the cabinets are in pretty rough shape. The outside edge is covered in paint and some of the edges are rusty, plus most of the shelves are cracked. Sorry for the old picture...I forgot to take pictures before I removed the cabinets.

I’ve wanted to replace them since I moved in, but I just never got around to it. So the first day of Christmas break I took a trip to Home Depot and bought two new cabinets. I can't find the one I bought listed online, but it's similar to this one (except the ones I bought were only $59/each). I ended up choosing this one because it was the same size as our current cabinets and I liked the beveled edge. 


I ended up removing the old cabinets/installing the new ones all by myself and it was really easy. I should have done it sooner! Although I probably should have made sure our drill was charged before I removed the old cabinets…

Anyway, I started by empting out the cabinets (duh!) and then I cut around the outside edge with a razor blade, so I wouldn’t rip the paint off the wall when I removed the cabinet. Then I just unscrewed the four screws holding the cabinet in and pulled it out. I don’t have any pictures because I was doing this by myself, but it’s pretty simple so pictures aren’t really necessary.

Installing the new cabinets by myself was a little harder, but definitely manageable. Basically I just put the new cabinet in the space, checked that it was level, drilled four holes, and then screwed it in place. 


It’s probably not that exciting of a change in pictures, but in person the room looks so much more modern.

It’s been awhile since we reviewed the to-do, so let’s see where I’m at now:

Paint Room?
Replace Missing Drawer
Paint Vanity
New Countertop
Replace Medicine Cabinets
Frame Large Mirror
New Shower Curtain
Re-Caulk Shower
Artwork
New Towels
Buy Bath Mat
Add Polka Dots to Trashcan
Accessories


LinkWithin