- See more at: http://tutorialgeek.blogspot.com/2010/11/how-to-change-your-blogger-domain-url.html#sthash.sezFio1Q.dpuf
Showing posts with label Master Bathroom. Show all posts

Tuesday, February 11, 2014

Mirror, Mirror

Sorry I’ve been MIA the past couple weeks. I’ve been crazy busy at work and haven’t had time/energy to blog or work on any projects. Today I’m going to share the final project I finished over Christmas break. If you’re counting, I ended up finishing four of the projects on my list (I sold my desk, updated our gallery wall, painted the china hutch, and now this). I had hoped to finish more projects during my time off, but painting the china hutch took more effort than I had originally planned. I do have the supplies for a couple of the other projects on my list, so hopefully I can get those done soon.

Anyway, let’s talk medicine cabinets. We have two medicine cabinets in our master bathroom and I love all the storage space. Unfortunately, the cabinets are in pretty rough shape. The outside edge is covered in paint and some of the edges are rusty, plus most of the shelves are cracked. Sorry for the old picture...I forgot to take pictures before I removed the cabinets.

I’ve wanted to replace them since I moved in, but I just never got around to it. So the first day of Christmas break I took a trip to Home Depot and bought two new cabinets. I can't find the one I bought listed online, but it's similar to this one (except the ones I bought were only $59/each). I ended up choosing this one because it was the same size as our current cabinets and I liked the beveled edge. 


I ended up removing the old cabinets/installing the new ones all by myself and it was really easy. I should have done it sooner! Although I probably should have made sure our drill was charged before I removed the old cabinets…

Anyway, I started by empting out the cabinets (duh!) and then I cut around the outside edge with a razor blade, so I wouldn’t rip the paint off the wall when I removed the cabinet. Then I just unscrewed the four screws holding the cabinet in and pulled it out. I don’t have any pictures because I was doing this by myself, but it’s pretty simple so pictures aren’t really necessary.

Installing the new cabinets by myself was a little harder, but definitely manageable. Basically I just put the new cabinet in the space, checked that it was level, drilled four holes, and then screwed it in place. 


It’s probably not that exciting of a change in pictures, but in person the room looks so much more modern.

It’s been awhile since we reviewed the to-do, so let’s see where I’m at now:

Paint Room?
Replace Missing Drawer
Paint Vanity
New Countertop
Replace Medicine Cabinets
Frame Large Mirror
New Shower Curtain
Re-Caulk Shower
Artwork
New Towels
Buy Bath Mat
Add Polka Dots to Trashcan
Accessories


Thursday, November 7, 2013

Polka Dot Trashcan

I used to have a cute silver trashcan in the master bathroom. I got it for a steal at Kohl’s and it looked great in the room (as great as a trashcan can look). But then we got Ringo and discovered that he likes to get into the trash (he especially likes to eat Kleenex). So every night before bed I put the trashcan up on the back of the toilet so he couldn’t get into it while we slept. That got old REALLY quick, so I decided to buy a trashcan with a lid. I ended up buying this one from Amazon. 


It kept Ringo out of the trash so I was happy, but it’s pretty boring looking. I lived with it plain for almost a year, but I finally decided I needed to jazz it up a bit. I didn’t want to do anything permanent, so I decided to add some silver vinyl polka dots. I used my Silhouette to cut out the dots, but you could also do this with a punch or with scissors. I used Cricut-brand vinyl (in silver, obviously) for this project. Yes, Cricut-brand vinyl on a Silhouette…scandalous, I know!


I placed the polka dots randomly on the trashcan. I even cut a few of them to place around the bottom edge and where the lid meets the can.


I ended up using about 60 polka dots to cover the trashcan. I think it turned out so cute!


This isn’t a groundbreaking project, but a lesson that something can be practical and pretty…even if it’s just a trashcan!


Thursday, August 15, 2013

Master Bathroom Artwork

Today we’re back in the master bathroom and we’re talking artwork. The bathroom is pretty small, so the only empty wall space is above the towel bar. After I replaced the black and white shower curtain, I knew had to replace the black and white artwork. I wanted some bright and fun, so I decided to use a printable from my Free Printables board.

 photo IMG_0701.jpg

The "Make Today Beautiful" print is a free download from Laura Winslow Photography - available here. I thought this would be a great message to read every morning while I’m getting ready for work. .

 photo IMG_0707.jpg


The frame is from Michael’s ($6.00). It was originally black, but I spray painted it white with some leftover Krylon Paint + Primer. One day I’ll probably replace this frame with a more ornate one, but this one works for now. As I said above, the printable was free and I had it printed out at Staples for less than $1. So with one cheap/easy project, the black and white décor is gone and the bathroom makeover is on a roll – time for those big projects!

OK, now let's review the ol' to-do list:

Paint Room
Replace Missing Drawer
Paint Vanity
New Countertop
Replace Medicine Cabinets
Frame Large Mirror
Re-Caulk Shower
Artwork
New Towels
Buy Bath Mat
Add Lettering to Trashcan
Accessories


Monday, August 5, 2013

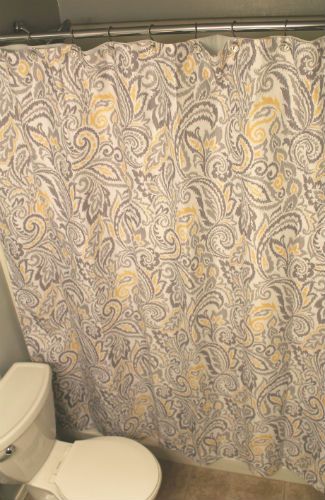
Gray and Yellow Paisley Shower Curtain

Alright, it’s time to kick-off this bathroom makeover - starting with a new shower curtain! Seriously, changing the shower curtain is the easiest/cheapest way to update a bathroom. It’s usually the main color/print/focal point, so swapping shower curtains always has a huge impact on the room.
 photo IMG_0698.jpg
It’s the same shower curtain that was on my mood board (Threshold Paisley Shower Curtain in Gray/Yellow from Target) and it looks way better in person than online. I think it looks kind of formal and stuffy online, but it’s bright and fun in person. I used the same glass shower curtain rings from before because they are amazing (from Target, but I don’t think they are available anymore).
Clearly Ringo approves of my $20 shower curtain update. Actually, he probably doesn’t care; he’s just obsessed with the shower/bathroom in general. He’s been known to sleep in the tub or shower hoping someone will give him a bath. Seriously, if you can get into the bathroom without him following you in, you win a prize at our house.
And so, the new shower curtain is up and the master bathroom makeover has officially begun!


Wednesday, July 17, 2013

Master Bathroom Mood Board

Although I’m still working on the living room and office, I’m ready to start on another room!
I’ve been talking about making over the master bathroom since I bought the house and now I’m finally ready to get going.
As a reminder, I started with this:

That’s the only picture I have of the original wall color and faucet. Shortly after closing we made a lot of updates: we painted the walls, replaced the faucet, replaced the light fixture, installed a new showerhead, updated the switches/outlet, replaced the toilet, and added a toilet paper holder. A few months later I added a new shower curtain, artwork, a towel bar, and replaced the baseboards. And that’s where this room stands today.


Well, I’m officially over the black and white damask shower curtain and sick of looking at a cabinet with a missing drawer, so it’s time for the makeover to begin. As with my last 3 rooms, I’m starting the makeover with a mood board. It really helps me to see everything together before I start shopping. Here’s what I put together for my bathroom (resource list at bottom of post):

Luckily my dad helped me with most of the projects when I first moved in, so this is mostly going to be a little painting, a couple projects, and a lot of decorating.

Although the walls are already gray, I think I’m going to re-paint them a different shade of gray. I’ve just never really loved the color on the walls. Right now I’m loving Kevin and Layla’s Gray Owl lightened by 50%.


The biggest project in the room is going to be the vanity.  I need to replace the missing drawer, but I’m thinking about replacing all of the doors/drawers for a more updated look (plus I think it’s going to be hard to get one matching drawer). I’m going to paint the whole thing white and replace the countertop with something darker. The current countertop has yellowed slightly, so I’m sure it’ll look horrible with a fresh, white cabinet.


Once that’s complete I’m going to frame the existing builder-grade mirror. I’m also going to replace the rusty medicine cabinets with new beveled glass ones. I kno
w some people think medicine cabinets are uncool, but I love having all the extra storage.

The new shower curtain is from Target and I’ve already checked it out in person. It’s lighter and less formal in person than in the picture. The yellow towels, rug and a few colorful accessories will add some color and fun to the room.

So here’s the official to-do list:
Paint Room
Replace Missing Drawer
Paint Vanity
New Countertop
Replace Medicine Cabinets
Frame Large Mirror
New Shower Curtain
Re-Caulk Shower
Artwork
New Towels
Buy Bath Mat
Add Lettering to Trashcan
Accessories


The list isn’t too bad and I’m hoping to get a couple items crossed off right away to gain some momentum!


Thursday, February 9, 2012

Master Bathroom Update

As usual, progress has been slow in the master bathroom. The missing drawer is the biggest holdup…and I’ve been too lazy busy to search around to get a replacement built. One of these days! I haven’t just been sitting on my bum though…I’ve made a few updates worth sharing.
As a reminder, we last left off at this:

I think the biggest change I’ve made has been adding some artwork to the room. Finding the perfect picture was so hard! I wasn’t sure exactly what I wanted and nothing caught my eye until a trip to Hobby Lobby (of course). I loved the picture, but I hated the frame. The red details aren’t really my thang.

Yay for spray paint! I painted the frame with the Krylon Dual Paint + Primer I had left over from my gallery wall and now I love it!

Problem solved!
I also bought new bath towels and one set of new hand towels. I’m still looking for a second set of hand towels (I like to use a separate towel for just my face).

I’m actually on my second set of new bath towels. I the first set I bought were quick dry towels from Target and I hated them. The texture was weird and I swear they made my hair static-y. Luckily, I bought them on sale and only wasted $20. Well, not really wasted…they’ll probably be Ringo’s towels for when he jumps in the pool.

The last small change is a new tissue holder – from Goodwill (originally from Bed Bath & Beyond). They make tissue boxes cuter than they used to, but I still think these are better looking.  

Cost
Chandelier Picture – Hobby Lobby $24.99 $12.49
Spray Paint – On hand
Bath Towels (1st Set) – Target $20.00 ($4 x 5)
Bath Towels (2nd Set) – Target $18.70 ($3.74 x 5)
Hand Towels - HomeGoods $17.97 ($5.99 x 3) $0 (gift card)
Tissue Holder – Goodwill $3.99 $0 (gift card)

Total $51.19
(Would be $31.19 if I didn’t have a towel FAIL)

Next step: Replace missing drawer!

LinkWithin