- See more at: http://tutorialgeek.blogspot.com/2010/11/how-to-change-your-blogger-domain-url.html#sthash.sezFio1Q.dpuf
Showing posts with label bathroom. Show all posts

Tuesday, September 20, 2011

Guest Bathroom Deets and Dollars

The “motto” of The Junk House is house to home on a budget. So, I think it’s only fair to share my bathroom budget. I don’t want y’all to think I’m cheating and buying everything high-end. Although, you probably know me better than that by now!
Quick Note: Some of the prices include tax and some don’t…


Paint Attempt #1 – Home Depot $21.58
Paint Attempt #2 – Home Depot $21.58
Art Work – Already Owned
Towel Bar – Lowe’s $44.18
Towels – Kohl’s $15.20 ($10 off coupon + 20% off coupon)
Shower Curtain Rod – Wal-Mart $10.96
Shower Curtain Rings – Target $0 (gift card)
Shower Curtain – Target $0 (gift card)

Picture Total $113.50


Basket – Hobby Lobby $24.99 $12.50
Candle – Birthday Present
Towels – See Above
Vase – Goodwill $0.69
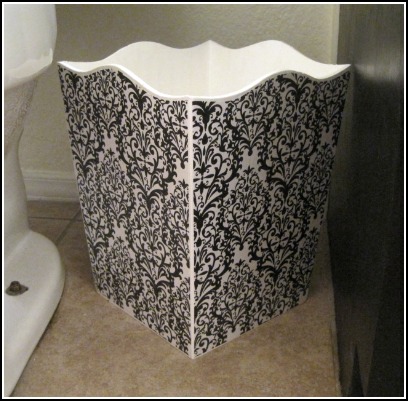
Trash Can – Hobby Lobby $16.31
Toilet Paper Holder – Lowe’s $0 (gift card)
Jars – EV Lutheran Thrift $3.00
Faucet –Overstock.com $57.99
Tissue Holder – Savers $7.99 $4.00
Black Paint – On Hand


Picture Total $94.49


Mirror – Bed Bath & Beyond $34.88
Mirror Paint and Primer – Wal-Mart $6.48
Medicine Cabinet – Home Depot $30.60
Switch and Outlet – Wal-Mart $5.85

Picture Total $77.81


Rug – Target $19.99
Not Pictured:
Light Fixture – Lowe’s $26.89
Showerhead – Wal-Mart $12.97

Picture Total $59.85

Grand Total $345.65
So, the bathroom went from crime scene to my favorite for less than $350. I feel like I got a great value with this makeover. I didn’t want to spend a lot of money, but I also wanted quality. I definitely achieved my goal.

Saved:
The shower curtain, shower curtain rings, and toilet paper holder were all purchased with gift cards from my credit card points. I don’t leave a balance on my credit card, so I don’t pay interest…so I consider those gift cards to be free money.
I couldn’t find an ORB faucet at Home Depot or Lowe’s for less than $100 (maybe there was one ugly one for $80). Buying my faucet online saved me almost $50.
As I mentioned before, buying the mirror at BB&B and painting it saved me $30.

Splurged:
I could have saved 20 bucks (and a lot of work) if I’d picked the right paint color the first time. Oops!
The biggest splurge was probably the towel bar at $44.18. My dad was in town to help me out and I needed a towel bar that day, so no time for online shopping. But I absolutely love the double towel bar, so no regrets here!

Friday, September 16, 2011

The Reveal – Guest Bathroom

I’ve been talking about my guest bathroom makeover for months now, and it’s finally time to show it off!
I’m so excited that I have one finished room in the house. But honestly, is a room ever finished?
If you missed the individual bathroom projects you can check them out here (paint), here (glass jars), here (linens), here (vanity), here (trashcan), and here (mirror).

Alright, let’s jump right to the good stuff!

Yep, LOVE!

Ok, now let’s do some before and after comparisons:
Before

After

Before

After

Before

After

Before

After

Before

After

One final “after” picture:

My little monster helper!

Bathroom makeover details and dollars post next week!
One room down, LOTS more to go!

Thursday, August 25, 2011

Can't find it? Make it!

Yeah, yeah – I know I’ve been slacking this week. I’ve been working my tail off, but I’m suffering from project A.D.D. I have half a dozen projects in work, but nothing completed…until now!
Last week I didn’t have a bathroom makeover feature…because I didn’t have either of the remaining projects finished! Now they are both done so this week I’ll be sharing 2 bathroom makeover projects! If you missed the previous parts you can read them here, here, here, and here.
Today we’re talking trash cans! Last week it was hampers, this week trash cans…exciting topics here lately!
I’ve been looking for a trash can for the bathroom for months now, but I could never find exactly what I wanted. Last Saturday I was wandering around Hobby Lobby (surprise, surprise) and I found this raw wood trash can and “light bulb” (as Gru from Despicable Me would say).

Duh! I can make a trashcan!
Supplies
Trashcan
4 pieces of scrapbook paper
Mod Podge
Paint


Step 1
Paint the inside and outside of trashcan.


I only painted the edges of the outside because the paper covers the rest (and I was running out of paint).

Step 2
Once the paint is dry (obviously), trace the trashcan on the back of the scrapbook paper.


Step 3
Cut out the shape plus an extra smidgen (technical measurement).

Step 4

Apply Mod Podge to the trash can and the scrapbook paper.
Paste that sucker on and smooth to remove any bubbles.
Step 5

Apply top coat of Mod Podge.
I also applied a layer of Mod Podge to the inside of the trash can. 

Repeat Steps 2-5 three more times =)

And finished:


Way better than anything I saw in the stores!

Cost

Trashcan - $5.99 Hobby Lobby
Scrapbook Paper - $0.59 Michael’s x4
Mod Podge - $6.99 Hobby Lobby (LOTS leftover for other projects)
Paint - $0.97 Wal-Mart
Total $16.31 (and I have almost a whole jar of Mod Podge leftover)


Tomorrow we're talking mirrors!

Friday, August 12, 2011

Black Dynamite

(No, I’m not talking about the movie)
It’s time for part 4 of the bathroom makeover reveal!
If you missed the first few parts you can catch up here, here, and here!
Today we’re talking about the vanity. Here’s the before picture:

I don’t know if you can tell from the picture, but this thing was rough. It looked pretty shabby, but was awesome to paint because I didn’t have to sand! Booyah!

First, I removed all of the doors and drawers. I primed and painted them with some paint leftover from a pre-blog project. The primer is Valspar Tintable Primer tinted dark gray and the paint is Olympic Premium (satin) in black.
While those were drying I primed and painted the cabinet.
Oops! I forgot to take a picture!

I think the edging turned out pretty legit if I do say so myself. I couldn’t use tape because the wall has so much texture, so that’s freehand baby!
While all of that was drying I sprayed the old hinges ORB. Love me some ORB!
I put all the pieces back together and…jumped around squealing with excitement!

I shouldn’t be surprised, but I am always amazed at the power of paint!
Cost of the project? Free! All of the supplies were leftover from previous projects!


Tuesday, July 26, 2011

Jar(s) of Hearts

This post has nothing to do with hearts. I just really like that song. If I ever go through another breakup I’m going to play that song on repeat…and Rolling in the Deep by Adele. Anywhoo, back to my jars.
I found these glass jars at EV Lutheran Thrift for $3.00 total. I think I found one each week for 3 weeks. At the time I didn’t have a project in mind, but I liked them, so I bought them.  
Before
$0.50


I taped up the glass parts and primed:

I sprayed them down with Krylon’s ORB and Minwax Poly.
I filled the jars with q-tips, cotton balls, and bath crystals.

Love! For only $3 I ended up with the perfect finishing touch for my bathroom makeover.

Speaking of my bathroom makeover...
Every week I’m planning to feature a different part of the makeover; working my way up to the big reveal. This is only part one!


LinkWithin