- See more at: http://tutorialgeek.blogspot.com/2010/11/how-to-change-your-blogger-domain-url.html#sthash.sezFio1Q.dpuf
Showing posts with label before and after. Show all posts

Monday, February 27, 2012

February After – Office

The time has come – the “after” of the February Project!


Shine Your Light
Y’all remember how my office looked at the beginning of the month:


Here’s how it looks 27 days later:

(plus a cute puppy)
OK, that picture is a little deceiving because it doesn’t show the whole room…  So, let’s take a before and after tour from each corner.
Before
After

The bed frame and fan were moved to the garage (where they belong). And the artwork on the floor was moved to my “art stash” in my craft room.  I added a pair of Overstock.com curtains (hung on a Hobby Lobby rod) to the room.

Before


After

(Yes, I like to watch Breaking Bad while I run on the treadmill)

I cleaned! All of that mess in the before picture was put away, donated to Goodwill, or thrown in the trash. I didn’t just move the mess to another room for the ‘after’ shot. The white bookcase is currently in the garage…I need to post it on Craigslist. The books were moved to a new bookcase in the closet.

Before

After


I finally painted the desk I bought off of Craigslist - full details to come in a separate post!

Before

After


We didn’t have enough room in the garage for the mattress, but making room in there is definitely on my list. I also haven’t found the perfect TV armoire yet.
With that, I managed to cross 7.5 projects off my to-do list!

Paint stripes on the walls
Find/sew curtains
Add top trim piece to closet doors
New closet door knobs
Add artwork
Finish painting the desk
Paint/upholster desk chair
Finally unpack “desk stuff” into desk
Organization system
Sell white bookcase on Craigslist
Buy/Build shelves where bookcase used to be
Find small bookcase/shelving system for the closet
Move boyfriend’s old mattress and bed into the garage
Find an armoire for the TV
Donate/trash unused/unwanted stuff

I still have some work to do, but I think it’s a huge improvement…and I love actually having a desk to work on!  As usual, I’ll keep you updated as I continue to cross projects off that list.

Monday, January 16, 2012

#2, Mounted


I’m finally sharing the second project we completed during Christmas Break! The master bedroom TV is finally off the dresser and on the wall!
Before

I should have taken a new before picture. A few weeks before we mounted the TV we moved the Blu-ray player into the bedroom. It was sitting on top of the cable box, hanging over the dresser about 6 inches. It looked stupid.

Anyway, I bought this TV Wall Mountfrom Amazon on Black Friday for $25 (it’s currently $27.99). Yes, that means we had everything to complete this project sitting around for about a month.  
Following the provided instructions, mounting the TV was easier than I thought it would be. At least it looked easy…my boyfriend did most of the work. My job was to hold stuff and go get the tools.

After
Yes, the cords bother me, but I didn’t have the balls to cut holes into the wall…yet.


You’ll be seeing this area again. I have plans for the top of dresser and of course something has to be done about the cords. And someday - a larger dresser.

You can’t really tell from the pictures, but there’s so much more room in that area now. It looks so much more open and spacious.

So, let’s talk about the third project I finished over Christmas Break. It’s done, but I’ve been obsessing over one of the hems (that might give you a clue about the project). Some days I think it’s straight and some days I think it’s crooked. I haven’t posted it yet because I’m *this* close to ripping out part of the hem (for the third time). So let’s just say that post is on hold this week.

*Link contains affiliate

Thursday, January 12, 2012

2012 Home Goals

Y’all know I like making lists, so I’m sure no one is surprised that I’m participating in Nester’s 2012 Home Goals party.

Instead of just listing specific projects I want to write this list a little differently.

#1
It’s almost been a year, time for my house to stop looking/feeling like I just moved in!
This means I will finish unpacking boxes and actually make some decorating decisions.  Instead of waiting for the perfect piece I need to start using what I have. I can always update/replace things, but for now, something would look better than nothing.
(Not a good look – The tile has been fixed since this picture)

#2
Stop being a cheap ass and spend some of the money I’ve been hoarding!
I’ve been saving money for a couple big projects/furniture pieces, but I’ve yet to act on any of them. I’m planning to:
Extend the Back Patio
Buy a New Couch
Buy a New Entertainment Center
And I’m planning to use my yearly bonus (depending on the amount) to replace my stove and microwave to match the other kitchen appliances.


#3
Simplify!
This one is going to be hard because I love stuff!

However, I don’t like dusting stuff. And I’m starting to feel like I’ve accumulated too much stuff! My boyfriend and I recently dropped off 2 boxes and 1 trash bag full of stuff to the Goodwill…it’s a good start, but I’m sure we have more.

#4
Stop apologizing for my house!
We work full-time and have a puppy – our house isn’t going to be perfect. It will get messy and things will be out of order. I need to remember that.
And I think we all know DIY projects take time. I can’t expect everything to happen overnight. This year I want to stop being embarrassed about the things that need to be fixed and start enjoying the fact that I have my own house. I know I’m very lucky and I want to try and be more appreciative of that.

Here’s a great “Quit Apologizing” post from Nester.

Wednesday, January 4, 2012

IKEA Frame to Shadow Box

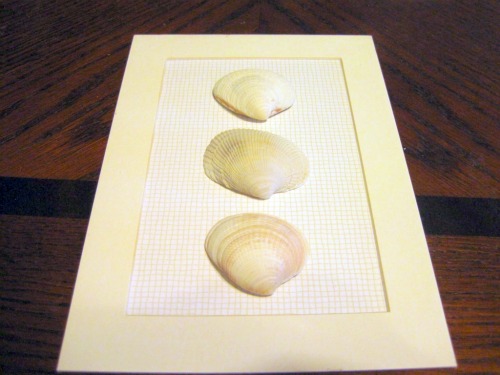
Yesterday I showed you my updated gallery wall and the seashell shadow box that I made. Today I’m going to share how I turned a cheapo IKEA frame into a shadow box.
While I was updating my gallery wall I decided to add a sentimental piece. Last June my boyfriend and I went to California with his family for a cousin’s graduation. Of course we had to stop at the beach while we were there! My boyfriend spent part of the afternoon in the surf looking for seashells. He ended up with a nice collection, but they’ve been scattered on my nightstand since I unpacked our beach bag. I decided to frame them up and add them to the wall as a reminder of our first trip together. 
I used a RIBBA frame from IKEA ($2.99). These work the best because they are nice and thick (and cheap).

Step 1: Remove the glass and innards. Paint the inside edge of the frame. I used Krylon Dual Paint + Primer Black in Satin. If you paint the inside anything other than black you’ll want to remove those black metal thingys too (I assume just pull out with pliers).

Step 2: Once the paint is dry, add a drop of hot glue to the inside corners of the frame. Place glass on top of hot glue. Be careful not to use too much glue – you don’t want it smushing out and showing through. I used hot glue, but you could also use gorilla glue or super glue.

Step 3: Cut background piece (I used scrapbook paper). Glue the mat that came with the frame to the background paper. Layout your items and then glue them onto the background paper. I used hot glue to attach my seashells.

Step 4: Add your items and the cardboard backing. Secure the cardboard backing by hot gluing around the edges. It ain’t pretty, but who will be looking at the back of the frame?  No one!

It’s not easy to get apart later, but it’s possible - trust me. An hour after I finished I dropped the whole thing and one of my shells fell off. I had to cut/peel the hot glue off to fix it. It wasn’t easy, but it wasn’t hard either.
Step 5: Hang and admire your handy work!


I’m sure there are other ways to do this, but this is what worked for me. Feel free to play around if you want yours to be less permanent. And if you don’t want to hassle at all, you can spend a little more money and buy a real shadow box. I would have bought the $9.99 option from IKEA if it had been the right size.

Tuesday, January 3, 2012

Pictures of You #2


Winter Break is officially over and it’s back to the grind today. Ugh! Last week I promised to finish 3 projects during my time off. I’m going to show y’all those projects over the next couple weeks…I can’t post 3 projects in one week – I don’t want to spoil you guys! Ha! Let’s start with the gallery wall expansion.
This is what my original gallery wall looked like.

Nothing wrong with it…just time for an upgrade.
I’ve been hoarding frames for the past few months for this project. I still have some leftover so expect Pictures of You #3 one of these days. I found all of these frames at various thrift stores. I’m pretty sure I didn’t pay more than $2.99 for any of them (most between 99 cents - $1.99). I sprayed all of the frames (including the original ones) with Krylon Dual Paint + Primer Black in Satin.

I promise they are all hung straight even though a few don’t look like it from the pictures.

OK, now let’s look at the individual pieces:

Top Left (moving clockwise-ish): our family dog Molly, sophomore year in college, free Nest printable from taidye original, group picture at a friend’s birthday, mirror, Bates Mercantile Co. Pink Louis Chair print (I won the print from a Crafty Scrappy Happy giveaway), Ringo in Greer, my boyfriend and I at Halloween, free peacock printable from Children Inspire Design, and free Olive You printable from Big D & Me.

Top Left (moving clockwise-ish): senior year of college, our first New Years Eve, my parents and me in Hawaii, my boyfriend and me at the BBQ festival, Ringo, shadowbox with seashells from our trip to California (tutorial tomorrow!), and free Home Sweet Home printable from The Pretty Blog.
All together from one more angle:

1 Winter Break project down; 2 to go! Anyone want to guess what other 2 projects I finished?

Wednesday, November 9, 2011

Pillow of Shame #2


Remember Pillow of Shame #1? And how it was one of my “decorative” pillows for 3 years?
5 months later…meet Pillow of Shame #2:

(I'm not even an Oakland A's fan)
Ohhh, the horror!
OK, the real horror is that I let this live on my couch for 3 years + 5 months!

Finally this pillow is getting a new look!

I started by laying my pillow out on a piece of fabric to “measure”. I say “measure” because I just sorta eye-balled it.


Then I used blue painter’s tape to create stripes on the fabric. I used a couple extra pieces to evenly measure between the stripes.


This is what it looked like all striped up.


While the fabric was just “hanging out” by the pool, I mixed Clorox bleach and some water in a spray bottle. I eye-balled about 1 part bleach, 2 parts water…next time I’d use more water.


Then I lightly sprayed my fabric with the bleach mixture. Just remember you can always spray more, but you can’t spray less! Oh, and please do this outside or in a well ventilated area. I don’t want you getting stoney-boloney off bleach fumes.


The bleach will start working quickly. This picture was taken after only a couple minutes. Let the bleach dry, remove the tape, and then throw the fabric in the wash machine. You’ll want to wash the bleach out of the fabric before using as a pillow, obviously.

Once my fabric was washed and ironed I used the 10 Minute Pillow Cover tutorial from Alicia at Thrifty and Chic to sew a new cover (I used the same tute for Pillow of Shame #1).

And bam:


Bleach striped pillow!

I’d planned to sew a button in the middle to give the pillow that tufted look,


but that plan is on hold until puppy decides to stop chewing/eating everything.


So maybe one day you’ll see this pillow again and it’ll have its button bling…


Disclaimer: I was provided a bottle of Clorox Bleach as part of the Clorox Regular-Bleach DIY Fashion campaign

Tuesday, September 20, 2011

Guest Bathroom Deets and Dollars

The “motto” of The Junk House is house to home on a budget. So, I think it’s only fair to share my bathroom budget. I don’t want y’all to think I’m cheating and buying everything high-end. Although, you probably know me better than that by now!
Quick Note: Some of the prices include tax and some don’t…


Paint Attempt #1 – Home Depot $21.58
Paint Attempt #2 – Home Depot $21.58
Art Work – Already Owned
Towel Bar – Lowe’s $44.18
Towels – Kohl’s $15.20 ($10 off coupon + 20% off coupon)
Shower Curtain Rod – Wal-Mart $10.96
Shower Curtain Rings – Target $0 (gift card)
Shower Curtain – Target $0 (gift card)

Picture Total $113.50


Basket – Hobby Lobby $24.99 $12.50
Candle – Birthday Present
Towels – See Above
Vase – Goodwill $0.69
Trash Can – Hobby Lobby $16.31
Toilet Paper Holder – Lowe’s $0 (gift card)
Jars – EV Lutheran Thrift $3.00
Faucet –Overstock.com $57.99
Tissue Holder – Savers $7.99 $4.00
Black Paint – On Hand


Picture Total $94.49


Mirror – Bed Bath & Beyond $34.88
Mirror Paint and Primer – Wal-Mart $6.48
Medicine Cabinet – Home Depot $30.60
Switch and Outlet – Wal-Mart $5.85

Picture Total $77.81


Rug – Target $19.99
Not Pictured:
Light Fixture – Lowe’s $26.89
Showerhead – Wal-Mart $12.97

Picture Total $59.85

Grand Total $345.65
So, the bathroom went from crime scene to my favorite for less than $350. I feel like I got a great value with this makeover. I didn’t want to spend a lot of money, but I also wanted quality. I definitely achieved my goal.

Saved:
The shower curtain, shower curtain rings, and toilet paper holder were all purchased with gift cards from my credit card points. I don’t leave a balance on my credit card, so I don’t pay interest…so I consider those gift cards to be free money.
I couldn’t find an ORB faucet at Home Depot or Lowe’s for less than $100 (maybe there was one ugly one for $80). Buying my faucet online saved me almost $50.
As I mentioned before, buying the mirror at BB&B and painting it saved me $30.

Splurged:
I could have saved 20 bucks (and a lot of work) if I’d picked the right paint color the first time. Oops!
The biggest splurge was probably the towel bar at $44.18. My dad was in town to help me out and I needed a towel bar that day, so no time for online shopping. But I absolutely love the double towel bar, so no regrets here!

Friday, September 16, 2011

The Reveal – Guest Bathroom

I’ve been talking about my guest bathroom makeover for months now, and it’s finally time to show it off!
I’m so excited that I have one finished room in the house. But honestly, is a room ever finished?
If you missed the individual bathroom projects you can check them out here (paint), here (glass jars), here (linens), here (vanity), here (trashcan), and here (mirror).

Alright, let’s jump right to the good stuff!

Yep, LOVE!

Ok, now let’s do some before and after comparisons:
Before

After

Before

After

Before

After

Before

After

Before

After

One final “after” picture:

My little monster helper!

Bathroom makeover details and dollars post next week!
One room down, LOTS more to go!

LinkWithin