- See more at: http://tutorialgeek.blogspot.com/2010/11/how-to-change-your-blogger-domain-url.html#sthash.sezFio1Q.dpuf
Showing posts with label craft. Show all posts

Wednesday, June 18, 2014

Patriotic Polka Dot Bunting

I always have the best intentions of decorating when a holiday rolls around, but I always end up putting it off for so long that the holiday passes without a single decoration being put out (except for Christmas). This year, for 4th of July, I’m determined to at least get one decoration put out before the fireworks are over. Although, I guess patriotic decorations work for Memorial Day too, so I’m late on decorating again…
 

Anyway, I decided to make red, white, and blue bunting for the 4th of July. Bunting is one of the easiest and cheapest crafts to make, so there’s really no excuse not to make it for every occasion (says the person who never decorates for holidays/seasons). All you need is paper, ribbon, scissors (or a cutting machine), and a hole punch. I picked up two sheets each of red and blue polka dot paper plus some ribbon at Michael's (less than $5 for this project). I used my Silhouette to cut out the triangles (4 per sheet), but you could easily do this with scissors. 


Once you have all of your triangles cut, punch two holes in each one and string them together on some ribbon. I use the first hole-punched triangle as a guide for the others, so everything lines up perfectly.  


And done - I told you it was easy!  


It’s only June 18th and I already have something festive for the 4th of July up in my house! That has to be a new record!  


Do you decorate for the holidays or seasons? Have you done any 4th of July projects lately?  


Linking up at: The Handmade Hangout 


Tuesday, April 10, 2012

Diaper Cake Tutorial

Today I have a rare kid/baby-related post for y’all. One of the ladies I work with is pregnant with her first girl (they have 2 boys already), so we decided to throw her a baby shower. As part of the decorating committee, I was in charge of a centerpiece. So I decided to try my hand at making a diaper cake.
Most of the diaper cakes I found online are made by rolling each diaper and wrapping it in a rubber band. I thought about doing that until I saw this diaper cake.
They are so many beautiful diaper cakes out there, but I especially liked that one. Mostly because of something a lady wrote in the comment section.  She basically said that she liked this cake because it would be less work for the mom to deconstruct. It makes sense – taking off 80 individual rubber bands would be a pain and I don’t want my gift to be a chore!
Taking that into consideration, here’s my first ever diaper cake:

I’m so happy with how it turned out! And everyone at work loved it!

So, how about a diaper cake making tutorial? I started off taking lots of pictures and then completely slacked off…my bad. Just stick with me and let me know if you have any questions.

Supplies

About 80 diapers (make sure they are white!)  
2 cardboard tubes
Large rubber bands
Coordinating ribbon
Safety pins
Cardboard
Paint
Scrapbook paper
Silk flowers
Onesie
Stuffed Animal
Wood Letter


Instructions
Wrap a diaper around a toilet paper tube (or paper towel/mailing tube cut to size).
* The first pack of diapers I bought weren’t white (FAIL), so I used those in the middle of the layers and covered them with a second package of white diapers (Pampers Swaddlers).

Continue layering and wrapping diapers in any direction.

Once the roll is large enough, secure with a large rubber band (I used an elastic headband because I’m too cheap to buy rubber bands)

Now the diapers will need to start being layered nicely. I tried to explain how-to in the picture below.

And this is what it should look like:

Continue layering until it’s the size you want. My bottom layer was about 12” in diameter.
Repeat process for next 2 layers…I didn’t use a cardboard tube for the top layer. Just roll a diaper and start wrapping around that.
Stuff the wrappers from the diapers in the cardboard tubes. I think it’s nice for the mom to know exactly what brand/size diapers are included in the cake. I used 2 bags of diapers, hence the 2 cardboard tubes.

Measure out a piece of ribbon and wrap tightly around the layer.

* You’ll notice in the final pictures that I ended up layering a larger ribbon under this one. Definitely go with 2 ribbons…it looks so much nicer.
Secure the ribbon with a couple small safety pins or hot glue.

Repeat for next 2 layers.
Now you can remove the rubber bands/elastic headbands.

Find something round that’s about the same size as the bottom layer (I used a mixing bowl) and trace it onto a piece of cardboard. Paint the cardboard – I just used cheap white acrylic craft paint.
If you don’t have any cardboard, you can buy cardboard cake rounds (usually in the craft aisle). They are already white, so no need to paint them.

Loosely trace the bottom 2 cake layers on coordinating scrapbook paper – don’t get pencil marks on the diapers.

Cut out the circle in a random-wavy pattern.

Hot glue the silk flowers (or you could make paper/fabric flowers) individually onto the ribbon to cover the safety pins.

And here’s where the pictures pretty much stop…
OK, time to layer – starting from the bottom:
Cardboard
Large diaper layer
Scrapbook paper
Middle diaper layer
Scrapbook paper
Small diaper layer

To secure the layers I used a wooden kabob skewer. Just work the skewer from the top down being careful not to stab through a diaper.

As you can see in the pictures above, I used blue diapers in the middle section of my layers. The blue diapers in the bottom 2 layers are covered by the scrapbook paper and the next layer, but the top layer is just hanging out there for the world to see. I solved this by adding an onesie to the top.

I topped the cake with a cute little stuffed hippo and stuck the left over flowers around the top layer. Just individually cut each flower leaving a little stem and tuck them in the diapers. Don’t hot glue them to the diapers!


And I think that’s about it…


Oh, later that night I ended up painting a wooden letter ‘A’ (for the baby’s name) and adding scrapbook paper with Mod Podge.

Sorry for the cell phone pic – I didn’t think to take a picture until I was on my way to work.

This is just what I did to create this specific diaper cake. There are hundreds of other tutorials out there and you can easy put your own spin on any of them (including this one).  
Have you ever made a diaper cake? Any other tips/tricks?

lil luna link party button HookingupwithHoHBeyond The Picket Fencecraft

Wednesday, January 4, 2012

IKEA Frame to Shadow Box

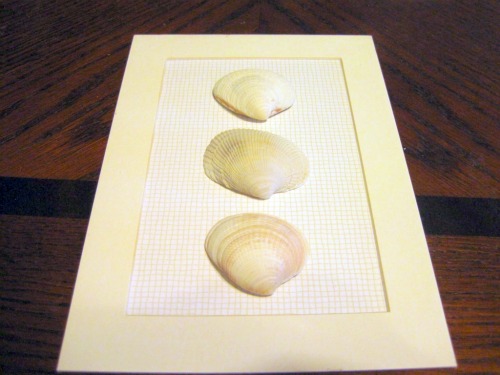
Yesterday I showed you my updated gallery wall and the seashell shadow box that I made. Today I’m going to share how I turned a cheapo IKEA frame into a shadow box.
While I was updating my gallery wall I decided to add a sentimental piece. Last June my boyfriend and I went to California with his family for a cousin’s graduation. Of course we had to stop at the beach while we were there! My boyfriend spent part of the afternoon in the surf looking for seashells. He ended up with a nice collection, but they’ve been scattered on my nightstand since I unpacked our beach bag. I decided to frame them up and add them to the wall as a reminder of our first trip together. 
I used a RIBBA frame from IKEA ($2.99). These work the best because they are nice and thick (and cheap).

Step 1: Remove the glass and innards. Paint the inside edge of the frame. I used Krylon Dual Paint + Primer Black in Satin. If you paint the inside anything other than black you’ll want to remove those black metal thingys too (I assume just pull out with pliers).

Step 2: Once the paint is dry, add a drop of hot glue to the inside corners of the frame. Place glass on top of hot glue. Be careful not to use too much glue – you don’t want it smushing out and showing through. I used hot glue, but you could also use gorilla glue or super glue.

Step 3: Cut background piece (I used scrapbook paper). Glue the mat that came with the frame to the background paper. Layout your items and then glue them onto the background paper. I used hot glue to attach my seashells.

Step 4: Add your items and the cardboard backing. Secure the cardboard backing by hot gluing around the edges. It ain’t pretty, but who will be looking at the back of the frame?  No one!

It’s not easy to get apart later, but it’s possible - trust me. An hour after I finished I dropped the whole thing and one of my shells fell off. I had to cut/peel the hot glue off to fix it. It wasn’t easy, but it wasn’t hard either.
Step 5: Hang and admire your handy work!


I’m sure there are other ways to do this, but this is what worked for me. Feel free to play around if you want yours to be less permanent. And if you don’t want to hassle at all, you can spend a little more money and buy a real shadow box. I would have bought the $9.99 option from IKEA if it had been the right size.

Wednesday, November 9, 2011

Pillow of Shame #2


Remember Pillow of Shame #1? And how it was one of my “decorative” pillows for 3 years?
5 months later…meet Pillow of Shame #2:

(I'm not even an Oakland A's fan)
Ohhh, the horror!
OK, the real horror is that I let this live on my couch for 3 years + 5 months!

Finally this pillow is getting a new look!

I started by laying my pillow out on a piece of fabric to “measure”. I say “measure” because I just sorta eye-balled it.


Then I used blue painter’s tape to create stripes on the fabric. I used a couple extra pieces to evenly measure between the stripes.


This is what it looked like all striped up.


While the fabric was just “hanging out” by the pool, I mixed Clorox bleach and some water in a spray bottle. I eye-balled about 1 part bleach, 2 parts water…next time I’d use more water.


Then I lightly sprayed my fabric with the bleach mixture. Just remember you can always spray more, but you can’t spray less! Oh, and please do this outside or in a well ventilated area. I don’t want you getting stoney-boloney off bleach fumes.


The bleach will start working quickly. This picture was taken after only a couple minutes. Let the bleach dry, remove the tape, and then throw the fabric in the wash machine. You’ll want to wash the bleach out of the fabric before using as a pillow, obviously.

Once my fabric was washed and ironed I used the 10 Minute Pillow Cover tutorial from Alicia at Thrifty and Chic to sew a new cover (I used the same tute for Pillow of Shame #1).

And bam:


Bleach striped pillow!

I’d planned to sew a button in the middle to give the pillow that tufted look,


but that plan is on hold until puppy decides to stop chewing/eating everything.


So maybe one day you’ll see this pillow again and it’ll have its button bling…


Disclaimer: I was provided a bottle of Clorox Bleach as part of the Clorox Regular-Bleach DIY Fashion campaign

Friday, September 16, 2011

The Reveal – Guest Bathroom

I’ve been talking about my guest bathroom makeover for months now, and it’s finally time to show it off!
I’m so excited that I have one finished room in the house. But honestly, is a room ever finished?
If you missed the individual bathroom projects you can check them out here (paint), here (glass jars), here (linens), here (vanity), here (trashcan), and here (mirror).

Alright, let’s jump right to the good stuff!

Yep, LOVE!

Ok, now let’s do some before and after comparisons:
Before

After

Before

After

Before

After

Before

After

Before

After

One final “after” picture:

My little monster helper!

Bathroom makeover details and dollars post next week!
One room down, LOTS more to go!

LinkWithin